


12
GAME REPAIR
WARNING: ALWAYS REMOVE POWER FROM
THE GAME BEFORE ATTEMPTING ANY SER-
VICE, UNLESS NEEDED FOR SPECIFIC TEST-
ING. FAILURE TO OBSERVE THIS PRECAU-
TION COULD RESULT IN SERIOUS INJURY TO
YOURSELF AND / OR OTHERS.
TROUBLESHOOTING
PHILOSOPHY
To find problems with the game, always check the
obvious first. See that the game is plugged in and
that all of the fuses are good.
Next, check to see that all of the connectors are
firmly seated and that no wires have been pulled
out.
When trying to find out if specific components are
bad or not, try swapping them with components from
another PINNACLE CRANE™ game, if available, to
see if the problem moves with the component or
stays where it was. This will help you decide if you
have a problem with a specific component or maybe
a problem with either the wiring or the main p.c.
board. Use extreme caution when using probes or
volt meters if the game is powered up. If checking
continuity, it is important to disconnect the
harnessing at both ends, as attached they may yield
erroneous results.
If a p.c. board is suspected as causing your
problems, check to see that all of the I.C. chips are
firmly seated on the board.
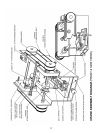
MAIN P.C. BOARD
REPLACEMENT
1. Remove all A.C. power from the game
2. Unlock and open the front door
3. Carefully remove all of the connectors from the
main p.c. board.
4. Remove the 4 long plastic hexagon nuts that
secure the board to the main board housing.
5. Gently pull the p.c. board from the mounting
studs.
6. Reassemble in the reverse order using a new
main p.c. board.
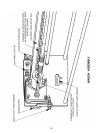
FRONT GLASS
REPLACEMENT
1. Remove all A.C. power from the game.
2. Remove the (3) 10-24 carriage bolts holding the
top glass frame in place.
3. Loosen the (5) 1/4-20 kep nuts holding each side
glass retainer in place and slide retainers back.
4. Loosen and remove the (3) self tapping screws
holding the bottom glass retainer / window val-
ance in place.
5. If the glass is broken, be sure to remove all
pieces from where the new glass will rest.
6. With proper ceiling height, slide the new glass in
from the top. NOTE: Be careful to proper align
the glass with the side channels to prevent
breakage.
7. When glass is properly seated, slide the side
glass retainers into place and tighten the (5) 1/4-
20 kep nuts for each side.
8. Re-install the bottom glass retainer and tighten
into place via the (3) self tapping screws
9. Re-install the top window frame and tighten into
place via the (3) 10-24 carriage bolts.
SIDE GLASS
REPLACEMENT
1. Remove all A.C. power from the game.
2. Remove wagon and crane assemblies.
3. Remove front and rear cabinet rails and hard-
ware.
4. Remove fluorescent lights and brackets on side
where glass is to be replaced.
5. Remove (2) side window retainers and (1) top
window retainer.
6. Remove side marquee.
7. Back out long 1/4-20 bolts that hold on the side
window retainers so they are flush with the 1”
tube frame.