358
44.
47.
48.
49.
50.
EX350 ASSEMBLY INSTRUCTIONS
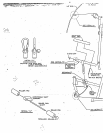
PuII.CABLE up to the PULLEY in the PULLEY HOUSING above the WEIGHT STACK on the
MAIN UPRIGHT TOP SECTION. Pull CABLE over and down PULLEY and thru hole in MAIN
UPRIGHT TOP SECTION to SELECT CENTER SHAFT on HEAD WEIGHT PLATE.
(REMOVE PULLEY FOR EASE OF INSTALLATION)
Attach the PRIMARY CABLE to the HEAD WEIGHT PLATE ASSEMBLY. b.v threading the
STUD into .the SELECT CENTER SHAFT and TIGHTEN COMPLETELY.
¯
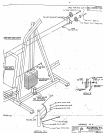
To install the SECONDARY CABLE. start by inserting the end of’the CABLE into the front of the
LOW ROW SWIVEL BRACKET. (REMOVE.PULLEY FOR EASE OF INSTALLATION)
¯ Pull the CABLE upward behind the PULLEY until the WHITE BALL stops at the frdnt of the LOW
ROW SWD,’EL BRACKET.
Run CABLE around the BOTTOM PULLEY of:the (SUSPENDED) PULLEY/PLATE
CONNECTOR ASSEMBLY.
Pull CABLE under PULLEY on WEIGHT STACK SUPPORT BASE tow’ards fro~t of bIACHINE.
(NOTE: BE SURE TO PLACE CABLE RETAINING "L" CLIP UNDER PULLEY
AFTERWARDS)
To finish SECONDARY CABLE INSTALLATION. run CABLE under PULLEY on the PULLEY
BRACKET of the LEG CURL EXTENSION,~Rbl. (REMOVE PULLEY FOR I.’ASE OF
INSTALLATION)
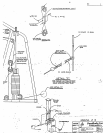
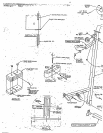
*** REFER TO ASSEMBLY DRAWING #4 FOR STEPS "45 THRU 58 ***
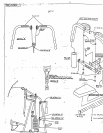
LOOSELY assemble two 12) 4-I ~ DIA. PULLEYSwith I IN. BUSHING. to the PULLEY BILA, CKET
SUPPORT as shown, using two (2I 3 8 X 2 IN. HEX HEAD BOLTS. t~vo (2) CABLE RETAINING
CLIPS and two ~2~ 3 8 IN. LOCKNUTS. (NOTE: DO NOT TIGHTEN)
Insert four (4) "~ 4 IN. FLANGE BEARINGS into the TOP and BOTTOM ends of the BI[JSHINGS in the
BEARING HOUSING.
lnsert’fbur {4) 2 IN. SQ. END CAPS into open ends of’LEFT and RIGHT PEC DEC ARMS.
Insert PIVOT of each ARM into FLANGE BEARINGS in the BEARING HOUSING a~ad secure with
two {2~ STAR LOCK COLLARS.
Peel offbacking fi-om t~o (2} 1 IN. SQ. PLASTIC STOPS. attach to ANGLE IRON’STOP BRACKET
on. BEARING HOUSING where ARM CAMS make contact.
Slide LARGE FOAM ROLLER PADS onto LEFT and RIGHT PEC DEC ARblS. (NOTE’." IF
LUBRICANT IS REQUIRED, PARABODY RECOMMENDS THOROUGHLY COATING THE
INSIDE OF THE GRIP WITH RUBBING .ALCOHOL)
52.
SECURELV assemble the SEAT PAD to MAIN UPRIGHT BOTTOM SECTION usilag two (2) 3/8
2-3 4 IN. HEX HEAD BOLTS and two t2) 3/8 IN. LOCK WASHERS.
9


