


093
17.
18.
19.
20.
21.
22.
NOTE:
23.
NOTE:
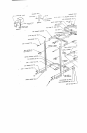
BODYSI~tTU PROSYSTEM ASSEMBLY INSTRUCTIONS
Attach one (1.) 3/4 X 2 IN. PAP,.AGLIDE St’RIP and one (I) 1-1/2 X2 IN. PARAGLIDE STRIP to
ADJUSTABLE KNEE SUPPORT as shown in (’DETAIL E) using the following steps:
A.
Thoroughly ciean all surfaces where the PARAGLIDE STRIPS are to be attached.
B.
Remove the paper backing from the PARAGLIDE STRIPS and firmly apply them to the shown
surfaces.
Assemble two (2) ROLLER PADS to the ADJUSTABLE KNEE SUPPORT, using one (I) ROLLER
PAD SHAr’-I’, and two (2) STAR LOCK COLLARS.
Insert one (I) 2 IN. SQ. END CAP into the front end of the ADJUSTABLE KNEE SUPPORT.
To use the ADJUSTABLE KNEE SUPPORT, rum the KNEE SUPPORT TUBE so that the ROLLER
PADS are vertical, tnse~ the pin into the desired hole, and rotate clockwise until locked. (SEE
DtL, kWlNG)
Attach eight (8) I-1D- X 2 PARAGLIDE STRIPS to the BAR HOLDERS, and SAFETY RAILS
shown in (DETAIL F) using the following steps:
A.
Thoroughly clean all surfaces where the PARAGLIDE STRIPS are to be attached.
Remove the paper backing from the PARAGLIDE STRIPS and fLrmly apply them to all shown
surfaces.
To use the BAR HOLDEP~, and SAFETY RAILS follow the same procedure as in ~TEP 20.
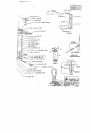
BEFORE PROCEEDING WITH CABLE INSTALLATION, UNRAVEL CABLE, AND REMOVE
AS MUCH SPIRALING AS POSSIBLE.
To install the PRIMARY CABLE (PB2827-I), start by inserting the end of the CABLE, WITHOV~F the
WI-IITE BALL between the TOP PULLEY and the LAT BAR HOLDER on the PULLEY MOUNT
FLATS. (REMOVE PULLEY FOR EASE OF INSTALLATION)
Pull CABLE over TOP PULLEY until the WHITE BALL stops against the PULLEY and the LAT BAR
HOLDER.
Pull CABLE over and down the SECOND PULLEY of the PULLEY MOUNT FLATS. Run the
CABLE around one of the PULLEYS of the PULLEY BLOCK SYSTEM and up to the THIRD
PULLEY of the PULLEY MOUNT FLATS.
Pull CABLE over and down the THIRD PULLEY, to the WEIGHT CARRIAGE. Attach the CABLE to
the WEIGHT CARRIAGE, using one (I) 5/16 IN. SNAP HOOK. (SEE DETAIL C)
See CABLE ROUTING DIAGRAM (DETAIL A) for help in completing STEP 23.
IF THIS UNIT WILL BE ASSElVIBLED WITH OPTIONAL PEC DEC, STOP HERE AND PdEFER
TO THE PEC DEC ASSEMBLY INSTRUCTIONS. COMPLETE STEPS #2 TH_RU # 1S. WHEN
THIS IS COMPLETED, SKIP STEP #24,AND CONTINUE ON TO STEP #25 OF TIq’E MAIN
UNIT INSTRUCTIONS.