


093 BODYSM]~TH PROSYSTEiV~ ASSE1V~BLY INSTRUCTIONS
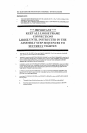
[NIP. ORTANT.:
¯
TIlE BODYSMITH PROSYSTEM MUST BE ASSEMBLED ON A FLAT LEVEL SURFACE TO
ASSURE ITS PROPER FUNCTION.
¯ PARABODY, INC. STRONGLY RECOMMENDS THAT THIS PRODUCT BE ~SSEMBLED .BY
TWO PERSONS TO AVOID POSSIBLE INJURY.
I~.EP ALL LOOSE FRAME
-CONNECTIONS
LOOSE UNTIL ~NSTRUCTED IN THE
ASSEN[BLY STEP SEQUENCES TO
,,SECURELY TIGHTEN
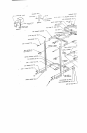
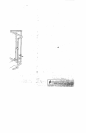
1. Insert six (6) 2 IN. SQ. END CAP into both FRONT UPRIGHTS. Two (2) into each end of the
LEG, and one (I) into the TOP end of the UPRIGHT.
LOOSELY assemble the BOTTOM UPRIGHT SUPPORT to both FRONT UPRIGI-rrs, using four (4)
3/8 X 3 IN. BOLTS, eight (11) 3/2 IN. WASHERS, four (4) 3/8 IN. LOCK WASH]ERS, and four 318 IN.
NUTS. (NOTE: THE LOW ROW BAR IIOLDERS ON THE BOTTOM UPRIGHT SUPPORT
SHOULD BE UNDERNEATH) (SEE DR.AWING)
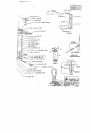
LOOSELY assemble the TOP UPRIGHT SUPPORT to both FRONT UPRIGHTS, using two (2) 3/g
3 IN. BOLTS, four (4) 3/8 IN. WASHERS, two (2) 3/8 IN. LOCK WASHERS, and two (2) 318 IN.
(NOTE: MAKE SURE THAT THE TOP UPRIGHT SUPPORT IS FLUSH WITH THE TOP OF
THE FRONT UPRIGHT) (SEE DRAWING)
LOOSELY assemble the MAIN UPRIGHT to the TOP and BOTTOM UPRIGHT SUPPORT, using
four (4) 3/8 X 3 IN. BOLTS, eight (8) 3/8 IN. WASHERS, four (4) 3/8 IN. LOCK WASHERS, and
(4) 3/8 IN. NUTS. (SEE DRAWING)
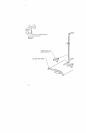
A~ach eight (8) CARRIAGE GUIDES to the WEIGHT CARRIAGE as shown in (DETAIL D) using
following steps:
A.
Thoroughly clean all inside surfaces xvherc the CARR.IAGE GUIDES are to be attached.
Bo Remove the paper backing from the CARRIAGE GUIDES and firmly apply them to all Shown
surfaces (8 places)