


8
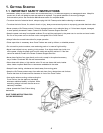
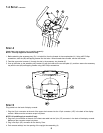
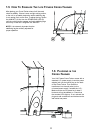
STEP 5
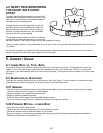
Plug cables into the back of display console:
1. Plug the 10-pin connector at the end of the upper wire harness into the 10-pin connector (10P) in the back of the display
console. Make sure the connector snaps into place.
NOTE: #2 and #3 apply to model x3i only.
2. Plug the 3-pin connector at the end of the heart rate cable into the 3-pin (3P) connector in the back of the display console.
Make sure the connector snaps into place.
3. Plug in flat 6 pin (6P) connector for the Activity Zone.
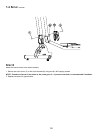
4. Push excess cable(s) into the opening of the upright tube assembly (A).
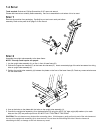
STEP 4
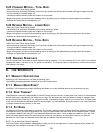
Attach heart rate accessory tray to upright assembly:
NOTE: This step applies to model x3i only.
1. Before attaching the accessory tray (G), it is helpful to form the threads in the console plate (H). Using a #3 Phillips
screwdriver, start the (#0) self-tapping screws into the holes. When threads have formed, remove the screws.
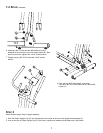
2. Feed the upper wire harness (J) through the slot in the accessory tray bracket (K).
3. Line up the holes on the accessory tray bracket (K) with the holes on the console plate (H), and then secure the accessory
tray with the two (#0) self-tapping screws using a #3 Phillips screwdriver.
1.4 SETUP CONTINUED