


5
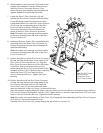
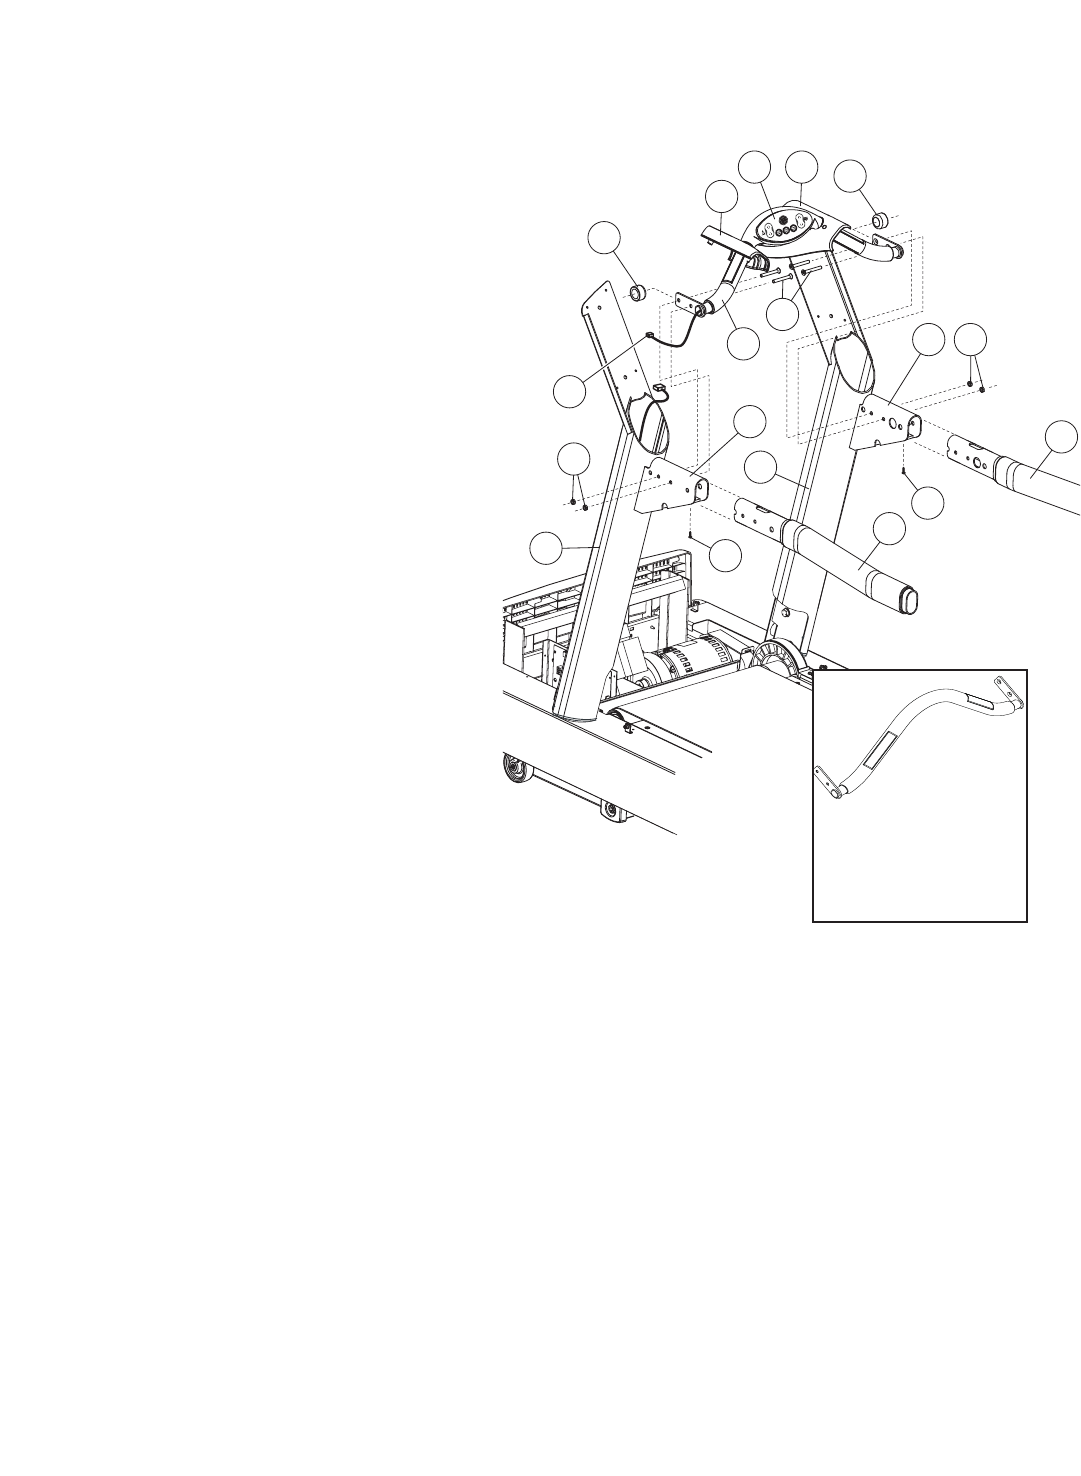
6. With the bend of one HANDLEBAR (3) directed to the
outside of the treadmill, insert the H
ANDLEBAR into
the RIGHT UPRIGHT HANDLEBAR BRACKET (L) as
shown. Be sure the handlebar mounting holes are
aligned. Repeat for the left side HANDLEBAR.
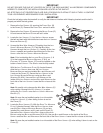
7. Locate the ERGO™ FRONT CROSSBAR (4) and
position the ERGO FRONT CROSSBAR with the plastic
COVER (M) facing upward and forward as shown.
Locate and slide the L
EFT and RIGHT INSIDE SHROUDS
(5 & 6) over the corresponding ends of the ERGO
FRONT CROSSBAR as shown. Slide the LEFT and
R
IGHT INSIDE HANDLEBAR SHROUDS towards the
center of the ERGO FRONT CROSSBAR as shown.
Note: Be careful not to damage any wire harness-
es that may be leading from the ends of the E
RGO
FRONT CROSSBAR (4).
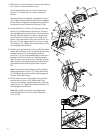
8. Install one ERGOBAR GASKET (26), rounded end first,
over either end of the E
RGO FRONT CROSSBAR (4).
Position the gaskets just over the end brackets to
meet the overmolding.
Note: Be careful not to damage any wire harness-
es that may be leading from the ends of the E
RGO
FRONT CROSSBAR (4).
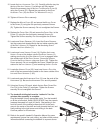
9. Position the right end of the ERGO FRONT CROSSBAR
(4) near the large access hole on the inside of the
RIGHT UPRIGHT HANDLEBAR BRACKET (L). Align the
ERGO FRONT CROSSBAR MOUNTING HOLES with those
in the RIGHT UPRIGHT HANDLEBAR BRACKET and
secure using two B
OLTS (19), from the inside of the
treadmill, and NUTS (22). Tighten the BOLTS securely.
Insert one S
CREW (17) from under the RIGHT
UPRIGHT HANDLEBAR BRACKET. Tighten the SCREW
securely.
10. Position the left end of the E
RGO FRONT CROSSBAR
(4) near the large access hole on the inside of the
L
EFT UPRIGHT HANDLEBAR BRACKET (N). Feed the
HEART RATE CABLE (O) into the access hole down-
ward out the bottom of the L
EFT UPRIGHT HANDLEBAR BRACKET.
Align the crossbar mounting holes with those in the LEFT UPRIGHT HANDLEBAR BRACKET and secure using two BOLTS
(19), from the inside of the treadmill, and NUTS (22). Tighten the BOLTS securely. Insert one SCREW (17) from under
the L
EFT UPRIGHT HANDLEBAR BRACKET. Tighten the SCREW securely.
Note: Be careful not to pinch the HEART RATE CABLE (O) (if equipped) when assembling the ERGO FRONT CROSSBAR
(4) to the LEFT UPRIGHT HANDLEBAR BRACKET.
Feed the HEART RATE CABLE (O) upward through the top of the LEFT UPRIGHT (1).
26
5
26
4
19
L 22
22
17
17
3
6
1
2
M
3
N
O
Note: The CLST model
does not have an
Activity Zone on the
Ergo™ Front Crossbar.