


4
IMPORTANT!
DO NOT DISCARD THE SHIP KIT LOCATED ON TOP OF THE DECK AND BELT. ALL NECESSARY COMPONENTS
NEEDED TO COMPLETE THE INSTALLATION ARE LOCATED IN THE SHIP KIT.
NE JETEZ PAS LE KIT D'EXPÉDITION PLACÉ SUR LE DESSUS DU PLATEAU ET SUR LE TAPIS. IL CONTIENT
TOUS LES ÉLÉMENTS NÉCESSAIRES POUR L'INSTALLATION.
IMPORTANT!
Check the belt edge under the treadmill to verify the belt does not interfere with Lifespring brackets and the belt is
properly set within the belt guides.
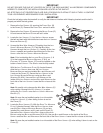
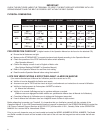
1. Remove the four SCREWS (A) securing the FRONT GRILL (B)
to the FRAME (C). Remove the FRONT GRILL and set it aside.
2. Remove the four S
CREWS (D) securing the MOTOR COVER (E).
Lift and remove the MOTOR COVER and set it aside.
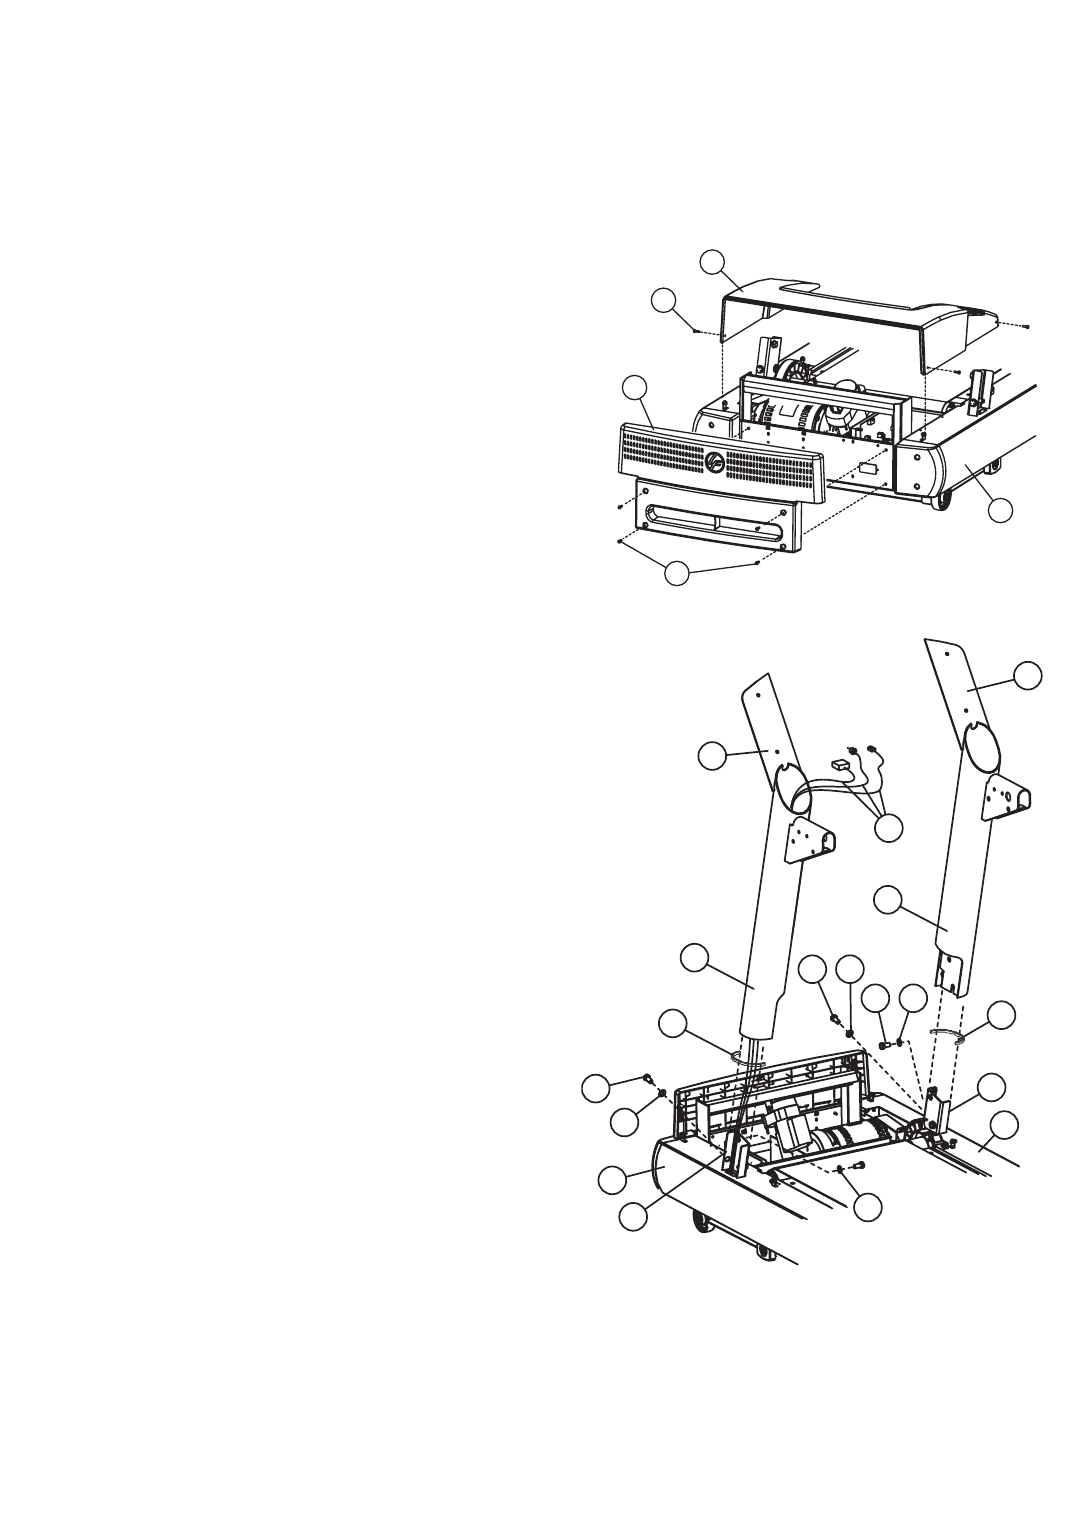
3. Locate the L
EFT UPRIGHT (1). Lay the LEFT UPRIGHT across
the belt and deck with the notched end near the L
EFT UPRIGHT
MOUNTING BRACKET (F).
4. Unwrap the MAIN WIRE HARNESS (G) leading from the LEFT
UPRIGHT MOUNTING BRACKET (F). Feed the MAIN WIRE
HARNESS through the LEFT UPRIGHT (1). Carefully tilt the LEFT
UPRIGHT upwards and position the notched end of the LEFT
UPRIGHT over the LEFT UPRIGHT MOUNTING BRACKET.
Note: Prior to attaching the L
EFT and RIGHT UPRIGHTS (1 &
2) to their respective MOUNTING BRACKETS (F & K), an
E
XTRUDED “U” CHANNEL GASKET (27) must be installed on the
bottom of each UPRIGHT. The GASKET must be fully seated.
With the LEFT TOP MOUNTING PLATE (H) directed forward,
slide the LEFT UPRIGHT down over the LEFT UPRIGHT
MOUNTING BRACKET and pre-installed BOLT and WASHER until
it rests on the FRAME (C). Secure the LEFT UPRIGHT to the
LEFT UPRIGHT MOUNTING BRACKET using two BOLTS and
W
ASHERS (20 & 24). Use one BOLT and WASHER on the
inside of the L
EFT UPRIGHT and one BOLT and WASHER on the
front side of the LEFT UPRIGHT. Leave the BOLTS loose at this
time.
Note: Be careful not to damage the M
AIN WIRE HARNESS (G)
when routing it through the L
EFT UPRIGHT (1) or when
sliding the L
EFT UPRIGHT over the LEFT UPRIGHT MOUNTING
BRACKET (F).
Note: Be sure the pre-installed washer is on the outside
of the LEFT UPRIGHT (1) when sliding it down to rest on
the FRAME (C).
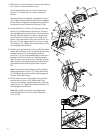
5. Locate the R
IGHT UPRIGHT (2). With the RIGHT TOP MOUNTING
PLATE (J) directed forward, slide the RIGHT UPRIGHT down
over the R
IGHT UPRIGHT MOUNTING BRACKET (K) and pre-
installed BOLT and WASHER until it rests on the FRAME (C).
Secure the RIGHT UPRIGHT to the RIGHT UPRIGHT MOUNTING
BRACKET using two BOLTS and WASHERS (20 & 24). Use one BOLT and WASHER on the inside of the RIGHT
UPRIGHT and one BOLT and WASHER on the front side of the RIGHT UPRIGHT. Leave the BOLTS loose at this time.
Note: Be sure the pre-installed washer is on the outside of the R
IGHT UPRIGHT (2) when sliding it down to rest on the
FRAME (C).
D
E
B
A
C
H
G
2
J
1
20
24
20
24
K
C
C
24
24
20
F
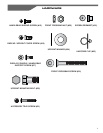
27
27