


12
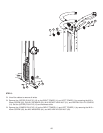
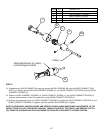
STEP 3:
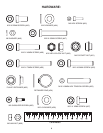
Use the following hardware contained in Blister Pack (7-2):
M10 x 45mm SCREW (Qty. 2)
M10 WASHER (Qty. 8)
M10 HEX NYLOCK NUT (Qty. 4)
M10 x 55mm SCREW (Qty. 2)
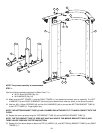
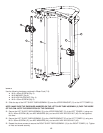
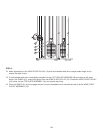
Slide the top of the LEFT SLIDE TUBE ASSEMBLY (5) over the UPPER BRACKET (C) on the LEFT TOWER (1).
NOTE: MAKE SURE THE ENGRAVED NUMBERS ON THE LEFT SLIDE TUBE ASSEMBLY (5) FACE THE INSIDE
OF THE GYM. NOTE THE ORIENTATION OF THE CARRIAGE.
Secure the LEFT SLIDE TUBE ASSEMBLY (5) to the UPPER BRACKET (C) of the LEFT TOWER (1) using one
M10 x 45mm SCREW (48), two M10 WASHERS (44), and one M10 HEX NYLOCK NUT (49). Do not tighten at
this time.
Secure the LEFT SLIDE TUBE ASSEMBLY (5) to the LOWER BRACKET (D) of the LEFT TOWER (1) using one
M10 x 55mm SCREW (47), two M10 WASHERS (44), and one M10 HEX NYLOCK NUT (49).
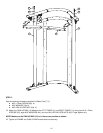
Repeat the above process to secure the RIGHT SLIDE TUBE ASSEMBLY (10) to the RIGHT TOWER (11). Tighten
all nuts and screws securely.
5
1
48
44
C
44
49
D
44
49
44
47
10
11
28
29