


2
Assembly Instructions
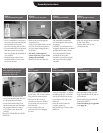
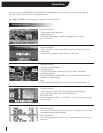
• On L7 treadmills it is necessary
to remove the bolts which hold
the treadmill to the pallet.
• Start by removing the top bolts.
• Lay the treadmill on the ground,
and then remove the bottom
bolts by placing the treadmill on
your toolbox.
• With the bolts removed, the
treadmill will be free to move
around in the box.
• Remove the metal strapping
around the box.
• Using a razor blade knife, cut the
box just above the bottom row
of brass staples along all sides
of the box.
•
DO NOT cut through the
center of the box, as you could
damage the treadmill.
• Remove the box and discard.
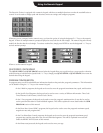
• The treadmill components
are held together with plastic
strapping.
• Carefully cut and remove the
strapping. Remove the treadmill
upright and accessory boxes
from the treadmill. Lift the
treadmill off the pallet.
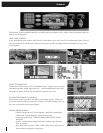
• Carefully remove the upright
side cover from the upright
assembly.
• Slide the upright down onto the
8-side frame bolts.
• Tighten bolts with a 7/16”
extended socket.
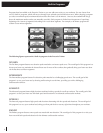
• The handrail mounting bolts
have been threaded into the rails
for shipping. Remove them.
• Attach both handrails by first
hand-starting the bolts through
the upright and then using a
1/2” socket. Leave about 1/8”
of slack.
(DO NOT TIGHTEN FLUSH TO
SURFACE).
• After mounting both handrails,
gently lower the curved crossbar
into position between them.
• Each end of the crossbar
should cover the two smaller
access holes that are cut into
the handrails.
• Leave contact heart rate
connection harness hanging
for now.
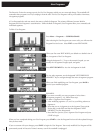
STEP 1:
Unbolt treadmill from pallet
STEP 2:
Cut the box off the pallet
STEP 3:
Unstrap the treadmill
STEP 4:
Secure upright to frame
STEP 5: Prepare to install hand
rails (Med Rails: the word
handrails refers to the 4”
clamps for steps 5-8)
STEP 6:
Place crossbar
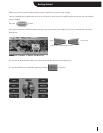
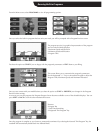
• Using an extended 1/2” socket,
carefully guide the 2 inch bolt
with lock washer into the big
access hole in the side of the
handrail.
• Once the bolt reaches the
crossbar, tighten it.
• Repeat this step with the other
handrail.
STEP 7:
Secure crossbar
• Press the dome plugs into the
large access holes on the side of
the handrails.
• Finish tightening the handrail
bolts from STEP 5.
• Note: Med Rails go to Appendix
A on page 30.
STEP 8:
Secure hand rail