


Treadmill Maintenance
29
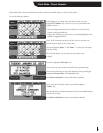
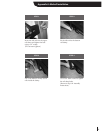
TRACKING
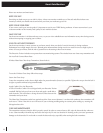
The treadbelt is tracked by means of the two 9/16” hex head bolts at the back end of the treadmill. Tightening (clockwise)
the adjustment bolt on the side of the machine that the belt has moved towards and loosening the bolt on the opposite side
an equal amount, will cause the belt to move towards the center. Adjustments should be made with the treadmill running
and in 1/4-turn increments. Allow at least 30 seconds for the belt to stabilize between each adjustment. Run the belt at high
speed (6-8 mph). To insure proper belt tracking and alignment, the treadmill must be placed on a stable and level surface.
A yellow warning label will show at the rear of the treadmill when the treadbelt is not tracked correctly (L8 and L9 only).
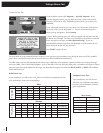
TREADBELT TENSIONING (pre-set from factory, but may need adjustment during installation)
Need for tension is indicated by uneven belt speed and may be sensed by sudden stopping of the treadbelt when your foot
comes down on the belt. To check belt tension, run treadmill at 1 mph. Then, walk on machine. If belt does not feel like it
is slipping/hesitating, then belt is tensioned correctly. If belt slips/hesitates, then it is not fully tensioned. The same hex head
bolts used for tracking also tension the treadbelt. To tighten the treadbelt, turn both bolts clockwise exactly the same
amount a 1/4-turn at a time. Failure to turn them equally will affect belt tracking. DO NOT OVER-TIGHTEN.Continue
checking for treadbelt slipping. Once treadbelt is fully tensioned, speed up treadmill to 5 mph. Then, while jogging lightly,
check for any sudden slipping/hesitating of the treadbelt. Repeat treadbelt tensioning instructions if required.
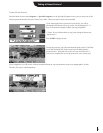
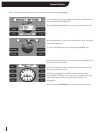
MOTOR DRIVE BELT TENSIONING (pre-set from factory)
The drive belt is tensioned by a nut located under the motor pan. This nut is screwed to a hook, which is attached to the
motor bracket. By turning the nut clockwise, you will tighten the nut pulling down the motor bracket, which will tighten the
drive belt.
D
D
O NO
O NO
T O
T O
VER
VER
-TIGHTEN
-TIGHTEN. If you over-tighten this belt you will snap the motor shaft. To measure the ten-
sion, twist the drive belt between the motor and the drive roller. The ideal tension will allow you to twist the drive belt 45˚.
If you can twist the belt past 45˚, it is too loose. If you cannot twist the belt to at least 45˚, it is too tight.
TREADMILL LUBRICATION & CLEANING
It is recommended that you vacuum around and underneath the treadmill on a monthly basis. Your treadmill will last
longer and look better if you wipe the sweat off the unit after each workout.
Lubrication is not required on residential treadmills. In institutional settings Landice recommends lubricating the underside
of the treadbelt with Landice SlipCoat on a monthly basis (see SLIPCOAT APPLICATION INSTRUCTIONS sheet in
Lubrication Kit Box).
MOTOR BRUSHES
Motor brushes should be checked every six months on institutional treadmills and after six years on home units.
Service Check-List
• Tension and track treadbelt
• Lubricate belt and vacuum treadmill
• Check drive belt tension
• Check motor brushes
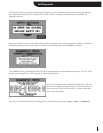
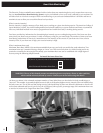
DANGER: Lethal voltages and moving parts capable of causing serious injury are exposed when the drive
housing cover is removed. Under no circumstances should the motor cover be removed except by a
Landice factory-authorized technician.
WARNING: Moving parts can cause serious damage.
Be sure to unplug treadmill before placing hands underneath the treadbelt!!!