


Page 16
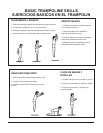
Step 1:
Step 2:
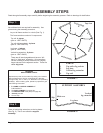
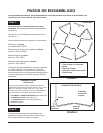
ASSEMBLY STEPS
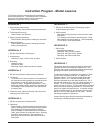
Read through all assembly steps carefully before beginning the assembly process. Refer to drawings for clarification.
4
4
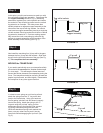
Top view
1
3
Top view
FIGURE 1
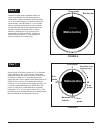
Slip
joint
Slide over
Vertical
leg extension
Leg base
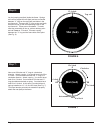
SUPPORT ASSEMBLY
FIGURE 2
1 Top rail w/leg sockets
2 Leg base
3 Vertical leg extension
4 Top rail
PARTS:
2
No additional tools are required for assembly. Use
gloves during the assembly procedure.
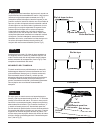
Lay out all frame sections in a circle (See Fig. 1).
The frame sections consist of 4 components:
Top rail - 4 pieces
(part no. JKXT12WTR)
Top rail with leg sockets - 4 pieces
(part no. JKXT12WTRS)
Leg base - 4 pieces
(part no. JKXT12WL)
Vertical leg extension - 8 pieces
(part no. JKXT12WLE)
These are all interchangeable and have no “left
hand” or “right hand” orientation. All connections
consist of sliding a section tube end into a slightly
larger tube end on the adjacent section. These are
called slip joints.
ORDERING
REPLACEMENT PARTS
Replacement parts can be ordered by calling our Customer
Service Department, toll-free, at 800/322-2211 Monday
through Friday, 8 a.m. until 5 p.m. Mountain Time (excluding
holidays). When ordering parts, please be prepared to give
the following information:
1. The NAME and MODEL NUMBER OF
THE PRODUCT.
2. The PART NUMBER (from page 26) .
3. The DESCRIPTION of the part (from page 26).
4. Quantity needed.
5. How to ship.
Place all vertical leg extensions on the leg bases
(See Fig. 2). This is now called the support
assembly.