


11
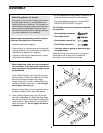
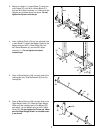
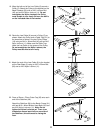
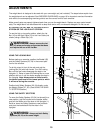
19. Wrap the ball end of the Low Cable (8) around a
Pulley (5). Attach the Pulley to the bracket on the
Base Crossbar (20) with an M10 x 45mm Bolt
(40) and an M10 Nylon Locknut (11). Do not
overtighten the Nylon Locknut; the Pulley
must be able to turn freely. Be sure the ball is
on the indicated side of the bracket.
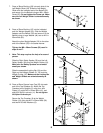
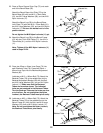
20. Route the Low Cable (8) around a Pulley (5) as
shown. Attach the Pulley and a Cable Trap (21) to
the lowest set of holes in the two Pulley Plates
(19) using an M10 x 45mm Bolt (40) and an M10
Nylon Locknut (11). Make sure the Cable Trap
holds the Low Cable in the groove of the Pulley.
Do not overtighten the Nylon Locknut; the
Pulley must be able to turn freely.
40
20
8
11
Ball
Bracket
5
20
19
40
21
8
5
11
19
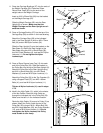
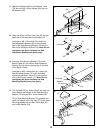
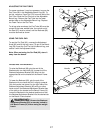
21. Attach the end of the Low Cable (8) to the bracket
on the Rear Base (3) using an M10 x 20mm Bolt
(26) and an M10 Nylon Locknut (11).
21
26
11
3
8
Bracket
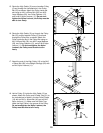
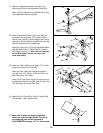
22. Press a 50mm x 70mm Outer Cap (65) onto each
end of the Stabilizer (66).
Attach the Stabilizer (66) to the Bench Frame (61)
with two M10 x 60mm Button Head Bolts (92) and
two M10 Nylon Locknuts (11). Note: Do not
tighten the Nylon Locknuts yet. There is an
indentation around each hole on one side of
the Stabilizer; this side must be facing the
floor.
22
92
65
11
61
66
65