


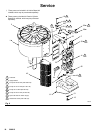
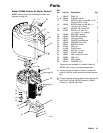

14 308213
Service
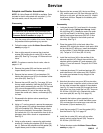
8. With your fingers, snap the slide blocks (119) off of
the valve carriage (111) to free the o-rings (120).
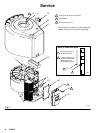
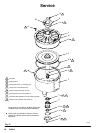
Clean and inspect the slide blocks. See Fig. 8.
9. Remove the screws (104) and disassemble the
bearing retainers (122), bearing rollers (121), and
pins (123). Clean and inspect these parts.
10. Clean and inspect the valve carriage (111). Re-
move and replace the bearings (107}).
11. To disassemble the detents:
NOTE: If you are using Detent Kit 222982, it is not
necessary to disassemble the detents. Just replace the
old detents with the new ones provided in the kit (see
Reassembly, step 9).
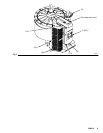
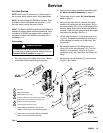
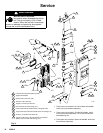
a. Hold the detent roller (115) with a pliers while
turning the plunger guide (113) slightly with a
wrench, until the locking tabs of the guide
disengage from the windows in the plunger
(114). See Fig. 5.
b. Use a flatblade screwdriver to pry out the
detent roller (115) and pin (117). See Fig. 8.
Fig. 5
02249
113
115
12. To disassemble the trip rod:
NOTE: If you are using Trip Rod Kit 222981, it is not
necessary to disassemble the trip rod. Just replace the
old trip rod with the new one provided in the kit (see
Reassembly, step 3).
WARNING
MOVING PARTS HAZARD
Use caution when disassembling the trip
rod. The trip rod spring (110) is under
tension. When the trip rod is unscrewed
tension is released, and parts may be projected
through the air with considerable force.
a. Place the flats of one trip rod (106) in a vise
with soft jaws and unscrew the other trip rod
(106) with a wrench. Be careful not to scratch
the trip rods (106). See Fig. 8.
b. Disassemble the trip rod assembly. Inspect the
press-fit bearings (129) in place in the spring
guides (108). Clean and inspect all parts.
13. Inspect the two detent plates (105) in place on the
valve housing (101). Remove if worn or damaged.
14. Inspect the carriage bumpers (128) and replace if
worn or damaged.
Reassembly
1. Install the detent plates (105) on the valve housing
(101). Apply thread sealant and torque the screws
(104) to 9 N.m (75 in-lb). Lubricate the plates with
heavy-duty lithium grease. See Fig. 8.
2. Assemble the trip rod.
NOTE: If you are using Trip Rod Kit 222981, it is not
necessary to assemble the trip rod. Skip steps a
through c, and go to step 3.
a. Press fit the bearings (129) flush with the
inside surface of the spring guides (108).
Apply thread sealant to one of the trip rods
(106) and screw the shaft (109) onto the rod.
b. Install the spring guides (108) in the spring
(110), with the flanges facing out. Apply thread
sealant to the second trip rod and slide both
trip rods into the spring guides.
c. Compress the spring so the shaft (109) and
trip rod engage two or three threads. Place the
flats of one trip rod in a vise with soft jaws.
Use a wrench on the flats of the other rod and
torque to 17–23 NSm (150–200 in-lb).
3. Install the trip rod assembly (T}) in the housing
(101). Grease the ends of the trip rod. See Fig. 4.
4. Lubricate the seal (102{}) and slide it onto the trip
rod (T}) and into the top hole of the housing (101)
with the lips facing into the housing. Lubricate
the rod fitting (103{}) and install in the housing
(see Fig. 4). Apply thread sealant and torque the
screws (104) to 2–3 NSm (20–30 in-lb). Repeat for
the bottom of the housing.