


308213 11
Service
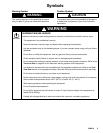
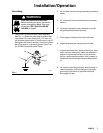
WARNING
To avoid serious injury and equipment
damage, do not lift the equipment by the
Premier air motor lift ring if the total
weight of the equipment exceeds 550 lb
(250 kg). The lift ring cannot support that
weight.
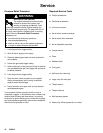
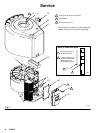
Air Motor Shroud
NOTE: Reference numbers and letters in parentheses
in the text refer to the callouts in the figures and the
parts drawing.
Disassembly
WARNING
To reduce the risk of serious injury whenever you
are instructed to relieve pressure, always follow the
Pressure Relief Procedure on page 10.
1. Stop the pump at the middle of its stroke. Relieve
the pressure before performing any service.
2. Disconnect the air supply and the ground wire.
3. If necessary, disconnect the displacement pump
from the air motor, as explained in your separate
pump manual.
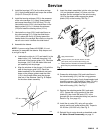
4. Unscrew the air inlet swivel (22). See Fig. 3.
5. Remove the three screws (13) and washers (51).
Lift the shroud (53) off the motor.
Reassembly
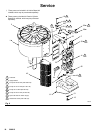
1. Make sure the rocker arm cover pad (63) and
cover plug (57) are in place.
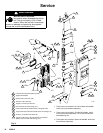
2. Place the shroud (53) on the motor so the three
notches in the top center align with the outer holes
in the lift ring (3). Apply sealant to the three screws
(13) and attach the shroud to the lift ring with the
screws and washers (51).
3. Install the air inlet swivel (22).
4. If the displacement pump was removed, reconnect
it as explained in your separate pump manual.
5. Reconnect the air supply and the ground wire.
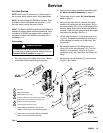
Air Valve Replacement
NOTE: Service the air valve every 3 million cycles. If
the air motor stalls, service the air valve immediately.
To replace the entire air valve assembly, order Part
No. 222799 and perform the following procedure. To
service the air valve, refer to pages 13–16.
NOTE: Air Valve Repair Kit 222959 includes the sub-
plate seals (27{) and gasket (26{).
WARNING
To reduce the risk of serious injury whenever you
are instructed to relieve pressure, always follow the
Pressure Relief Procedure on page 10.
1. Stop the pump at the middle of its stroke. Relieve
the pressure before performing any service.
2. Remove the air motor shroud as described under
Air Motor Shroud Disassembly, at left.
3. Use a 6 mm allen wrench to remove the six socket
screws (28) holding the air valve (25) to the motor.
Remove the air valve.
4. Inspect the subplate gasket (26{) and seals (27{)
for wear or damage. Always replace the gasket
(26{) when replacing the air valve. Grease the
grooves of the slide plates (G), then install the
seals (27{) in the grooves with the curved sides
facing out (see the Detail in Fig. 3).
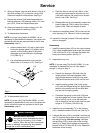
5. Grease the ends of the trip rod (106).
6. Install the new air valve (25), using a 6 mm allen
wrench and the six socket screws (28). Torque to
22–23 NSm (195–205 in-lb).
7. Reinstall the air motor shroud as described under
Air Motor Shroud Reassembly, at left.