


Pag. 31.
9. Precautions and procedures
9.1 Emergency equipment and knowledge
You should never go for a bike ride without the following emergency equipment and knowledge:
• Allen wrenches 4 mm., 5 mm. and 6 mm., used to tighten various clamping bolts that may loosen
• Patch kit and a spare inner tube
• Tyre levers
• Tyre pump or cartridge inflator with correct head to fit your tyre valves
• Identification (address, phone number, insurance company, emergency contact, blood type, medical
allergies and conditions)
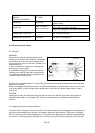
9.2 If you get a flat tyre
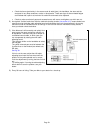
(a) Let all the air out of the inner tube (see section 6.6.2).
Remove one side of the tyre from the rim by inserting a tyre lever in between the rim and base of the
tyre’s side wall (“bead”).
Pry the bead away from the rim by pushing down on the tyre lever.
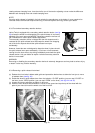
Take another tyre lever and pry the bead off the rim approximately 10-15 cm. (four to six inches) away
from where you started. A third lever may be needed, but at this point you should be able to begin
levering the bead off the rim so that the entire circumference of one side of the tyre bead comes off the
rim.
(b) Remove the inner tube. First remove the nut that fixes the air valve to the rim. After that, remove the
valve from the rim’s valve hole, then remove the inner tube.
Carefully check the outside and inside of the tyre for the cause of the puncture (thorn, glass shard, nail,
etc.) and remove the object if it is still there.
If the tyre is cut, line the inside of the tyre in the area of the cut with something that will resist the inner
tube forcing its way out of the cut once inflated: a spare patch, a piece of inner tube, a bank note, an
energy bar wrapper, a piece of plastic milk carton, etc.
(c) Either patch the tube (follow the instructions in your patch kit), or use a new inner tube. (It is always a
good idea to have a patch kit as well as a new inner tube in case the old inner tube cannot be patched).
In case a new inner tube needs to be applied, the wheel needs to be disassembled.
(d) Before replacing the new/repaired inner tube, put just enough air in to give it some shape.
Starting with the air valve, install the inner tube into the tyre.
Then, starting at the valve, slip the exposed tyre bead into the rim using downward pressure. Make sure
the bead seats down below the valve’s thick rubber base.
Next, push the tyre’s bead down into the rim with your thumbs along either side of the circumference of
the rim, not just one side. Make sure the inner tube is not being pinched by the bead. If you have trouble
getting the last few cm./inches of bead over the edge of the rim with thumb pressure, use a tyre lever
and be careful not to pinch the tube.
CAUTION:
Do not use a screwdriver or any tool other than a tyre lever, as you are likely to pinch and puncture the
inner tube.
(e) Check to make sure the tyre is evenly seated around both sides of the rim and that the inner tube is
inside the tyre beads. Push the valve stem into the tyre to make sure that its base is seated within the
tyre’s beads.
Inflate the tube slowly to the recommended pressure (see section 6.6.1), all the while checking to make
sure that the tyre beads stay seated in the rim.
Reinstall the nut that fixes the valve to the rim.
Put the valve cap back in place.
Place the wheel back into the bike (see section 6.3).