


Pag. 24.
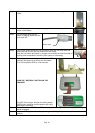
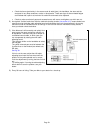
6.3.5 Installing a quick-release front wheel
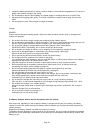
(a) Rotate the quick-release lever so that it curves away from the wheel (see fig. 31 and 35). This is the
“OPEN” position (you can read “OPEN” on the lever).
(b) With the fork facing forward, insert the wheel between the fork blades so that the axle seats firmly to the
top of the slots which are at the tips of the fork blades - the fork dropouts. The quick-release lever should
be on the left side of the bicycle (see fig. 31 and 35).
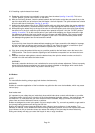
(c) Holding the quick-release lever in the “OPEN” position with your right hand, tighten the tension adjusting
nut with your left hand in a clockwise direction until it is finger tight against the fork dropout (see fig. 31).
(d) While pushing the wheel firmly to the top of the slots in the fork dropouts, and at the same time centring
the wheel rim in the fork, rotate the quick-release lever upwards and push it into the “CLOSE” position
(see fig. 31 and 34). To do this use the palm of your hand while wrapping your fingers around the right
fork blade and squeezing the lever closed using your fingers and hand together. You have the proper
tension if the lever leaves an impression in the palm of your hand. The lever should be parallel to the
fork blade/pointing upward and curved toward the wheel.
CAUTION:
If you can fully close the quick-release without wrapping your fingers around the fork blade for leverage,
and the lever does not leave a clear imprint in the palm of your hand, the tension is insufficient. Open
the lever; turn the tension adjusting nut clockwise a quarter turn; then try again.
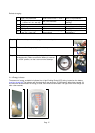
(e) If the lever cannot be pushed all the way to a position parallel to the fork blade, return the lever to the
OPEN position. Then turn the tension adjusting nut anti-clockwise one-quarter turn and close the lever
again.
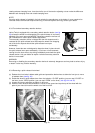
(f) Reattach the elbow cable guide to close the brake shoes; then spin the wheel to make sure that it is
centred in the fork and clears the brake shoes.
WARNING:
Secondary retention devices are not a substitute for correct quick-release adjustment. Failure to properly
adjust the quick-release mechanism can cause the wheel to wobble or disengage, which could cause
you to lose control and fall, which may result in serious injury.
6.4 Brakes
NOTE:
For most effective braking, always apply both brakes simultaneously.
WARNING:
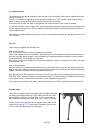
Sudden or excessive application of the front brake may pitch the rider over the handlebar, which may cause
serious injury.
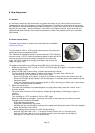
How brakes work
It’s important to your safety that you instinctively know which brake lever controls which brake on your bike.
The braking action of a bicycle is a function of the friction between the brake surfaces - the brake shoes and
the wheel rim. To make sure that you have maximum friction available, keep your wheel rims and brake
shoes clean and free of lubricants, waxes or polishes.
Brakes are designed to control your speed, not just to stop the bike. Try, as much as possible, to get used to
the (strong) braking performance during your first ride.
Braking and traction forces change dramatically when riding on loose surfaces or in wet weather. Tyre
adhesion is reduced, so the wheels have less cornering and braking traction and can lock up with less brake
force. Moisture or dirt on the brake shoes can reduce their ability to slow and stop the wheel effectively.
Riding more slowly will help you control the bicycle in wet or rough conditions.