


32
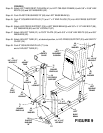
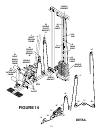
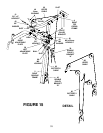
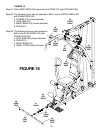
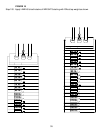
FIGURE 15
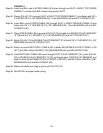
Step 88.
Step 89.
Step 90.
Step 91.
Step 92.
Step 93.
Step 94.
Step 95.
Step 96.
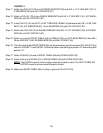
Insert one BALL end of UPPER CABLE (93) down through one SLOT in RIGHT TOP CROSS
FRAME (11) and the other BALL down through other SLOT.
Place a PULLEY (76) into each SLOT in RIGHT TOP CROSS FRAME (11) and fasten with 3/8” x
2” HEX BOLTS (51), 3/8” WASHERS (62), 13mm BUSHINGS (46) and 3/8” LOCKNUTS (67).
Insert BALL end of UPPER CABLE (93) through SLOT in RIGHT OBLIQUE FRAME (2) and
fasten with 3/8” x 2” HEX BOLTS (51), 3/8” WASHERS (62), 13mm BUSHINGS (46) and 3/8”
LOCKNUTS (67).
Place UPPER CABLE (93) in groove of PULLEY (76) and attach to DOUBLE PULLEY BRACKET
“A” (39) with 3/8” x 2” HEX BOLT (51), 3/8” WASHERS (62) and 3/8” LOCKNUTS (67).
Attach PULLEY (76) to DOUBLE PULLEY BRACKET “B” (40) with 3/8” x 2” HEX BOLT (51), 3/8”
WASHERS (62) and 3/8” LOCKNUT (67).
Attach one end of BUTTERFLY CABLE (92) to either ADJUSTABLE PLATE (27 RIGHT or 29
LEFT) with M8 x 25mm HEX BOLT (48), M8 WASHERS (64) and M8 LOCKNUT (69).
Insert BUTTERFLY CABLE (92) down through PIVOT PULLEY BRACKET (32), under PULLEY
(76) in DOUBLE PULLEY BRACKET “A” (39), up through other TURN PULLEY BRACKET, and
attach to other ADJUSTABLE PLATE (27 RIGHT or 29 LEFT) with M8 x 25mm HEX BOLT (48),
M8 WASHERS (64) and M8 LOCKNUT (69).
Make sure cables are riding in groove of PULLEYS (76).
See DETAIL for proper cable routing.