CONDITION/PROBLEM THINGS TO CHECK SOLUTION
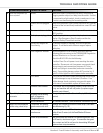
Drive pulley and flywheel
pulley.
Unplug power from Unit. Wait at least 5 minutes. Remove
left side plastic drive cover to expose “v” belt drive line.
Using a ½” wrench, tighten the bolt that attaches the 4
½” drive pulley to the drive shaft while holding the drive
rollers still. Also, using a 5/32” hex wrench, tighten the
setscrew on the flywheel motor pulley. Reinstall plastic
drive cover.
Rear roller. If knocking sound seems to be coming directly from the
rear roller, replace.
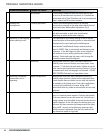
Hydraulic cylinder bolts. Unplug power from Unit. Wait at least 5 minutes. Check
and tighten both upper and lower bolts that connect the
hydraulic cylinders to the unit.
Front rollers. If knocking sound seems to be coming directly from one or
both of the front rollers, remove and replace rollers.
Virtual pivot. Access the virtual pivot by removing the rear step plastic
and rear step. The virtual pivot will be under the rear roller
and has 2 brackets (one on each treadle, which rolls on 4
cam followers (large bearings). Make sure all 4 brackets
are rolling (turning) as the treadles pivot. If knocking/
squeaking is coming from the virtual pivot or if any of the 4
cam followers are not rolling the virtual pivot (also referred
to as "Bearing Roller Kit") should be replaced.
Treadle alignment If treadles are not centered between the uprights and
are contacting one of the uprights check if treadles are
parallel. If not adjust virtual pivot. If treadles are parallel
but are still contacting an upright entire machine must be
replaced.
7
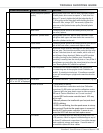
Belts stop turning and "err
LS" or "err OS" is displayed
Calibration Re-calibrate machine. (See Calibration Procedures, Pg 26)
SPEED SENSOR
1. Cycle power off and on
2. Put the machine in calibration mode (see Calibration
procedures, Pg 26) but do not start the calibration routine.
3. Remove right rear base plastic cover to allow access to
LED board. Caution: Machine is on. Current is active!!
4. Locate LED D on the motor controller board. LED may
be lit or unlit.
5. Manually advance the treadle with your foot, and check
if LED D is blinking.
6. If LED D is not blinking, then the speed sensor is not sup-
plying a signal. Check that the speed sensor is connected
securely to P1 on the motor controller. If sensor is con-
nected and LED D still does not flash replace sensor.
I/O cables If LED D is flashing when the belts are turning but err LS
or OS persists, check for signs of visible damage to any of
the three I/O calbes and connections. If no visible damage
check continuity using a multi-meter. If a multi-meter is
not available replace all three cables.
TROUBLE SHOOTING GUIDE
63
Bowflex® TreadClimber® Owner’s Manual


