


1
1
2
2
3
4
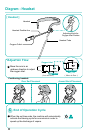
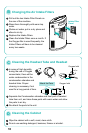
Around Neck PlacementOver Ear Placement
A
[ Headset ]
Diagram - Headset Operation
Headset
Headset Flexible Arm
Oxygen Outlet
Headset Tube
Operation
Getting started
Open the box containing your Tranquil Sounds
Oxygen Bar, check the contents and make sure the
following components are enclosed:
Oxygen concentrator unit
Headset and hose (including optional condensation
chamber
)
Operation manual
If there are missing items, please contact the
dealer where you purchased your Tranquil Sounds
Oxygen Bar.
Read user manual carefully.
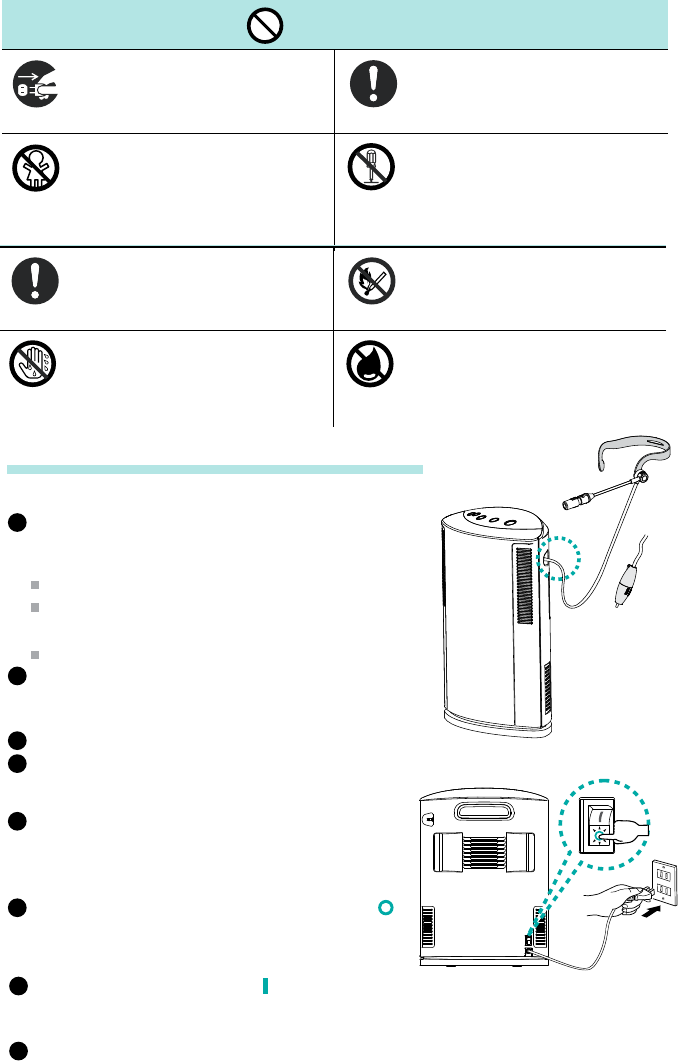
Connect the hose provided to the oxygen outlet on the side of the Oxygen Bar.
Operating Procedure
Place unit on a stable, flat surface which is clean
and free of dust. Do not set base on carpet or
other soft surface as this could cause air flow
restriction and damage to unit.
Check to see that the power switch is in the " "
(OFF) position.
Plug power cord into electrical outlet.
3
4
Press the power switch to " " (ON) position. The power switch is located at
the back of the machine in the lower bottom corner. When the power switch is
turned on it is in “stand by” status and there is no indication light.
Position the headset over your ears and adjust the position of the flexible arm.
Press the “On” button on the control panel to start the machine.
The fixed time setting is 10 minutes. The music does not operate unless turned on.
Set the running time by pressing the Start Timer Button as follows :
Positioning headset:
Time Setting
1
1
2
Move the arm in an
up/down direction to adjust
the oxygen inlet.
Oxygen Inlet
Larger Hole
Larger Hole
Small HoleSmall Hole
( Less air flow ) ( More air flow )
Press the Button one time and the unit will run 20 minutes, and the 20
minute indicator window will light.
Press the Button two times and the unit will run 30 minutes and the 30
minute indicator window will light.
Press the Button three times and the unit will run 40 minutes and the 10
minutes and 30 minutes indicator window will light.
Press the Button four times and the unit will run 50 minutes and the 20
minutes and 30 minutes indicator window will light.
Press the Button five times and the unit will run 60 minutes and the 10
minutes, 20 minutes and 30 minutes indicator window will light.
Press the Button one time again and the unit running time will be reset to
10 minutes.
Adjusting Knob for
Oxygen Inlet Postion
Adjust Air Flow
When the set time is counting down, the time indicator
will change indicating the time remaining.
3
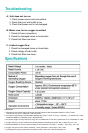
*In areas of high humidity,
use the condensation
chamber to collect excess
water condensate from the
unit.
Note: Using the
condensation chamber will
reduce airflow. Use only if
necessary.
*
1
1
2
2
3
4
Around Neck PlacementOver Ear Placement
A
[ Headset ]
Diagram - Headset Operation
Headset
Headset Flexible Arm
Oxygen Inlet
Headset Tube
Condensation Chamber
Operation
Getting started
Open the box containing your Tranquil Sounds
Oxygen Bar, check the contents and make sure the
following components are enclosed:
Oxygen concentrator unit
Headset and hose (including condensation
chamber
)
Operation manual
If there are missing items, please contact the
dealer where you purchased your Tranquil Sounds
Oxygen Bar.
Read user manual carefully.
Connect the hose provided to the oxygen outlet on
the side of the Oxygen Bar.
Operating Procedure
Place unit on a stable, flat surface which is clean
and free of dust. Do not set base on carpet or
other soft surface as this could cause air flow
restriction and damage to unit.
Check to see that the power switch is in the " "
(OFF) position.
Plug power cord into electrical outlet.
3
4
Press the power switch to " " (ON) position. The power switch is located at
the back of the machine in the lower bottom corner. When the power switch is
turned on it is in “stand by” status and there is no indication light.
Position the headset over your ears and adjust the position of the flexible arm.
Press the “On” button on the control panel to start the machine.
The fixed time setting is 10 minutes. The music does not operate unless turned on.
Set the running time by pressing the Start Timer Button as follows :
Positioning headset:
Time Setting
1
1
2
Move the arm in an
up/down direction to adjust
the oxygen inlet.
Oxygen Inlet
Larger Hole
Larger Hole
Small Hole
Small Hole
( Less air flow ) ( More air flow )
Press the Button one time and the unit will run 20 minutes, and the 20
minute indicator window will light.
Press the Button two times and the unit will run 30 minutes and the 30
minute indicator window will light.
Press the Button three times and the unit will run 40 minutes and the 10
minutes and 30 minutes indicator window will light.
Press the Button four times and the unit will run 50 minutes and the 20
minutes and 30 minutes indicator window will light.
Press the Button five times and the unit will run 60 minutes and the 10
minutes, 20 minutes and 30 minutes indicator window will light.
Press the Button one time again and the unit running time will be reset to
10 minutes.
Adjusting Knob for
Oxygen Inlet Postion
Adjust Air Flow
When the set time is counting down, the time indicator
will change indicating the time remaining.
3
1
1
2
2
3
4
Around Neck PlacementOver Ear Placement
A
[ Headset ]
Diagram - Headset Operation
Headset
Headset Flexible Arm
Oxygen Inlet
Headset Tube
Condensation Chamber
Operation
Getting started
Open the box containing your Tranquil Sounds
Oxygen Bar, check the contents and make sure the
following components are enclosed:
Oxygen concentrator unit
Headset and hose (including condensation
chamber
)
Operation manual
If there are missing items, please contact the
dealer where you purchased your Tranquil Sounds
Oxygen Bar.
Read user manual carefully.
Connect the hose provided to the oxygen outlet on
the side of the Oxygen Bar.
Operating Procedure
Place unit on a stable, flat surface which is clean
and free of dust. Do not set base on carpet or
other soft surface as this could cause air flow
restriction and damage to unit.
Check to see that the power switch is in the " "
(OFF) position.
Plug power cord into electrical outlet.
3
4
Press the power switch to " " (ON) position. The power switch is located at
the back of the machine in the lower bottom corner. When the power switch is
turned on it is in “stand by” status and there is no indication light.
Position the headset over your ears and adjust the position of the flexible arm.
Press the “On” button on the control panel to start the machine.
The fixed time setting is 10 minutes. The music does not operate unless turned on.
Set the running time by pressing the Start Timer Button as follows :
Positioning headset:
Time Setting
1
1
2
Move the arm in an
up/down direction to adjust
the oxygen inlet.
Oxygen Inlet
Larger Hole
Larger Hole
Small Hole
Small Hole
( Less air flow ) ( More air flow )
Press the Button one time and the unit will run 20 minutes, and the 20
minute indicator window will light.
Press the Button two times and the unit will run 30 minutes and the 30
minute indicator window will light.
Press the Button three times and the unit will run 40 minutes and the 10
minutes and 30 minutes indicator window will light.
Press the Button four times and the unit will run 50 minutes and the 20
minutes and 30 minutes indicator window will light.
Press the Button five times and the unit will run 60 minutes and the 10
minutes, 20 minutes and 30 minutes indicator window will light.
Press the Button one time again and the unit running time will be reset to
10 minutes.
Adjusting Knob for
Oxygen Inlet Postion
Adjust Air Flow
When the set time is counting down, the time indicator
will change indicating the time remaining.
3
6
Product and accessories illustration
Precautions
Operation
Maintenance
Troubleshooting
Specifications
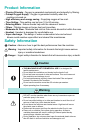
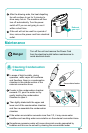
Danger
Table of Contents
Brief Introduction
Introduction
Product Function
A compressor forces air through the Oxygen Enriching Nano Membrane Filter. The
filter blocks out larger air molecules such as Nitrogen allowing for a higher
concentration of oxygen. It increases the 21% oxygen levels in the air at sea level
to 30% or about 43% more Oxygen. After vapor condensation and filtration, the
increased oxygen is given out to the user through the Oxygen Bar headset. At the
end of the cycle the Tranquil Sounds Oxygen Bar will start the cleaning and purging
cycle, clearing it and readying it for the next use.
Product Information
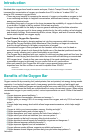
• Physics Principle : Oxygen is generated mechanically and naturally by filtering.
• Prompt Oxygen Supply : Oxygen is generated instantly when the
machine is turned on.
• High efficiency and energy saving : Supplying oxygen at low cost.
• Time Setting : Time setting can be from 10 to 60 minutes.
• Relaxing Music : Nature sounds help with the release of tension.
• Filters : Filtration keeps out larger dust and impurities.
• Moderate Air Flow : Moderate and mild air flow avoids discomfort within the nose.
• Headset : Headset is designed for comfortable use.
• Vapor discharge : The design of water condensation tube and exhaust
blower avoids residue vapor effect and cleans filter membranes.
Safety Information
Warning
: Important safety information for hazards that might cause serious
injury or machine breakdown.
Danger :
Urgent safety information for hazards that will cause serious injury or death.
Caution : Advice on how to get the best performance from the machine.
Check the electrical rating on the
unit label and wall outlet before
connecting the power cord.
When the power cord is found
damaged or broken, send it to your
dealer or authorized service center
for examination or repair.
Infant, child, or disabled people
should use under the watch of other
adult to avoid accidental injury.
Do not attempt to open cabinet. If
service is required, return unit to a
qualified dealer or an authorized
service center. Opening or
tampering with the unit will void
warranty.
Tranquil Sounds
Oxygen Bar
4
6
5
9
11
11
O
x
y
g
e
n
E
n
r
i
c
h
i
n
g
m
e
m
b
r
a
n
e
21% Oxygen in
Air at sea level
Increases Oxygen to
30% concentrated
3
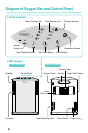
4 5
[ Control panel ]
[ Main body ]
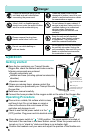
Dangerous
Please remove the plug from
electric outlet when not in use.
Keep the unit and all electrical
cords away from heated surfaces
or appliances. The oxygen will
make the material flammable.
Do not reach for the unit in the event
the unit falls into water. Unplug the
unit immediately, then send it to your
dealer or authorized service center
for examination or repair.
Do not use while bathing or
with wet hands.
Warning
DO NOT use the machine when there are any hazardous vapors or
pesticide spray in the room.
Do not use while bathing or in other wet location to avoid the risk of
serious or fatal injury from electrical shock.
Do not leave the machine near heated areas. High heat will cause
the plastic case to deform.
Disconnect the power cord from the electrical outlet if not in use.
Place unit on a stable, flat surface during operation. A tilted or
unstable placement will result in shifting of internal parts thereby
causing larger vibration and noise.
During operation, do not press hard upon the external plastic tube as
this will result in air flow restriction and damage to unit.
Caution
THIS MACHINE IS NOT FOR MEDICAL USE. It is designed for
health maintenance.
Do not block the ventilation port located on the back of unit.
Do not set base on carpet or other soft surface. This could cause air
flow restriction and damage to unit.
For best performance, regularly clean the Intake Filter and panel
located in the back of the machine.
Do not use the machine more than 60 minutes per session.
Adjust operating time if necessary.
Diagram of Oxygen Bar and Control Panel
On/Off Button
Operation Indicator
Exhaust IndicatorTime Indicator (x3)Music Indicator (x4)
Start Timer ButtonMusic Selection Button
Volume
Control
Front of machine Back of machine
Control Panel
Speaker
Air Intake
HandleOxygen Outlet
Exhaust Vent
Intake Filter Panel
Intake
Filter Panel
Heat Dispelling Vent
Power Switch Power Cord
Safety Information – (Continued)