


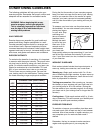

6
29
55
30
27
1
2
1
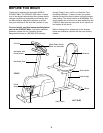
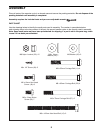
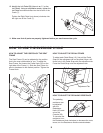
1. Loosen the Frame Knob (29) on the right side of the
Frame (1). Slide the Seat Frame (2) out until it
stops. Tighten the Frame Knob.
Attach the Stabilizer (30) to the Seat Frame (2) with
two M8 x 70mm Carriage Bolts (27) and two M8
Nylon Locknuts (55).
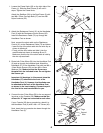
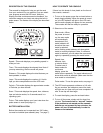
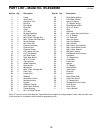
2. Attach the Resistance Control (31) to the Handlebar
Post (3) with the Resistance Control Screw (56).
Insert the Resistance Cable (70) up through the
Handlebar Post as shown.
Next, connect the short cable on the Resistance
Control (31) to the Resistance Cable (70) as follows:
¥ Insert the tip of the short cable into the wire clip as
shown in drawing A.
¥ Firmly pull the short cable and slide it into the
metal bracket as shown in drawings B and C.
Make sure that the tip of the short cable is held by
the wire clip as shown.
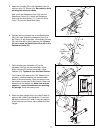
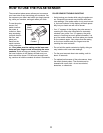
3. Route both Pulse Wires (59) into the Handlebar Post
(3) and up through the indicated hole. Attach the
Handlebar (57) to the Handlebar Post with two M8 x
15mm Button Screws (53) and two M8 x 19mm
Washers (54). Make sure that the Screws are
threaded into the indicated holes. Do not tighten
the Screws yet.
Important: All drawings in this manual show the
Handlebar (57) attached to the front of the
Handlebar Post (3). However, the Handlebar can
be attached to the back of the Handlebar Post,
as shown in the inset drawing. Choose the posi-
tion that is the most comfortable for you.
2
3
56
31
Short Cable
3
59
Hole
3
54
54
57
53
53
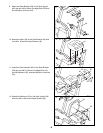
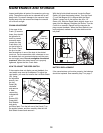
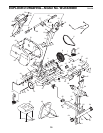
4. Connect the two Pulse Wires (59) to the correspond-
ing wires on the Console (33). Make sure that the
wires with ÒXÓ tags are connected to each other.
If your Console (33) has a ground wire, attach it to
the Handlebar Post (3) with a #8 x 1/2Ó Screw (43).
Next, insert the long console wire down through the
Handlebar Post (3).
Console
Wires
Long
Console
Wire
Ground
Wire
ÒXÓ Tags
33
43
3
59
4
70
57
3
A
B C
Wire
Clip