


10
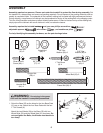
14. Make sure that all parts are properly tightened before you use the treadmill. Note: Extra hardware may
be included. Keep the included hex keys in a secure place. The large hex key is used to adjust the walking
belt (see page 17). To protect the floor or carpet, place a mat under the treadmill.
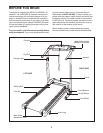
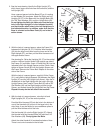
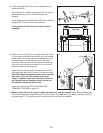
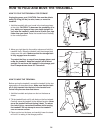
12.Lower the Uprights (32, 37) until the Handrails (4) are
touching the floor.
See drawing 12a. Position the Uprights (32, 37) so that
t
he treadmill Frame (21) is centred between the
Uprights.
Firmly tighten the four Upright Bolts (28). Then, raise the
Uprights (32, 37) back to the vertical position.
Firmly tighten all of the bolts and screws used in
assembly.
32
21
37
Top View
2
8
4
21
3
2, 27
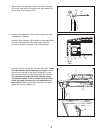
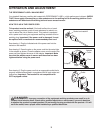
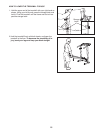
13. Insert an Incline Leg (47) into the right side of the Frame
(21) as shown, and adjust the Incline Leg to the desired
height. (Note: The Incline Leg can be adjusted to any of
four positions to vary the intensity of your exercise.)
Next, fully insert an Incline Pin (46) into the Frame and
the Incline Leg, and turn the Incline Pin to the “locked”
position shown in the drawing 13a.
Insert the other Incline Leg (not shown) and Incline Pin
(46) into the left side of the Frame (21) in the same way.
CAUTION: Before using the treadmill, make sure that
both Incline Pins are fully inserted at the same
height. In addition, make sure that both Incline Pins
are inserted from the direction shown. Do not use
the treadmill without the Incline Pins.
Lower the treadmill (see HOW TO LOWER THE
TREADMILL FOR USE on page 15).
21
46
46
46
13a
12a
12
13
47