


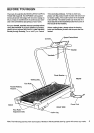


ASSEMBLY
Set the treadmill in a cleared area and remove all packing matedals. Do not dispose of the packing materials until
assembly is completed.
THE FOLLOWING TOOLS ARE REQUIRED FOR ASSEMBLY: The Included 7/32" allen wrench
and your own adjustable wrench _ .
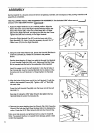
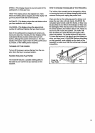
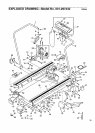
1. Raise the Right Handrail (12) to a vertical position.Align the
hole in the lower end of the Right Handrail with the h01e in the
side of the Frame (36). Insert one of the three 3/8" x 2" Bolts
(28) into the Right Handrail, and tighten the Bolt into the Frame.
Tighten the Bolt that is already in the Right Handrail.
Press the Right Handrail Cap (27) onto the lower end of the
Right Handrail (12). Note: It may be necessary to push the 12"
Cable Loom (10) into the Right Handrail.
Tighten
2. Using the 7/32" Allen Wrench (9), loosen the Handrail Bolt that is
under the Console (6). Rotate the Console to the position
shown.
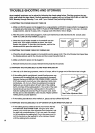
See the inset drawing. If there is a cable tie through the Handrail
(1) and Handrail Cage Nut (38), cut it. Make sure that the Cage
Nut is inserted intothe hole in the underside of the Handrail.
Insertthe upper end of the Left Handrail (1) into the left side of
the Console (6). Insert a Handrail Bolt (2) into the bottom of the
Console and the Left Handrail (1). Finger tighten the Handrail
Bolt.
2
1 38
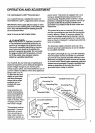
3. Align the holes in the lower end of the Left Handrail (1) with the
holes in the treadmill Frame (36). Tighten a 318" x 2" Bolt (28)
into each hole.
Press the Left Handrail Cap (68) onto the lower end of the Left
Handrail (1).
See step 2. Using the 7/32" Allen Wrench (9), tighten the two
Handrail Bolts (2) under the Console (6).
28 1 36
6
4. Remove the paper backing from the Wrench Clip (16). Press the
Wrench Clip onto the Right Rear Endcap (59) inthe indicated lo-
cation. Press the 3/16" Allen Wrench (58) into the Wrench Clip.
Make sure that all parts are tightened before usingthe treadmill.
Note: To protect the floor or carpet from damage, place a mat
under the treadmill.
_59
16