


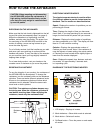
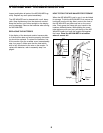
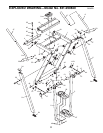

5
8
8
2
3
50
23
Holes
5. Slide one of the Handles (8) onto the Left Leg (2).
Attach the Handle with two Button Head Screws
(50) and two 1/4Ó Locknuts (23). Tighten the
Locknuts until the Handle cannot move. The
Handle will be deformed slightly when the
Locknuts are properly tightened.
Attach the other Handle (8) to the Right Leg (3) in
the same manner.
6. The decal shown at the right is found in the
indicated location on the AIR WALKER. If the
decal is missing, or if it is not legible, call our
Customer Service Department, toll-free, to
order a free replacement decal (see
ORDERING REPLACEMENT PARTS on the back
of this manual). Apply the decal in the location
shown.
Fig. 5
Make sure that all parts are properly tightened before
you use the AIR WALKER.
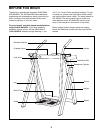
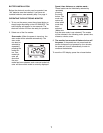
4. Connect the Reed Switch Wire (12) to the wire on
the Electronic Monitor (9). Feed any excess wire
into the Crossbar Cover (19). Press the Monitor
onto the Crossbar Cover so the Fasteners (48) on
the Monitor snap into the holes in the Crossbar
Cover.
Fig. 4
9
48
19
48
12
Do not allow children on or
around machine.
Keep hands and feet away
from moving parts and contact
points.
Read owner's manual and
follow instructions.
!
Fig. 6