


8
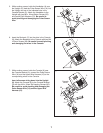
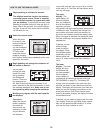
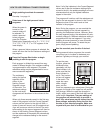
9. Apply a small amount of grease to the axle on the
left Crank Arm (40).
Identify the Left Pedal Leg (28), which is marked
with a decal. Slide the Left Pedal Leg onto the axle
on the left Crank Arm (40). Next, slide a Wave
Washer (101) onto the end of the axle. Then, slide a
Large M8 Washer (70) onto an M8 x 25mm Patch
Screw (73), and tighten the Patch Screw into the
axle.
Snap a Pedal Cushion (74) around the Left Pedal
Leg (28) onto a Cushion Bracket (99). Make sure that
the arrow on the Pedal Cushion is pointing to one of
the numbers on the Left Pedal Leg and that the num-
ber shows through the window in the Cushion
Bracket.
Assemble the Right Pedal Leg (not shown) in the
same way
.
10. Identify the Left Pedal Arm (33), which is marked
with a decal. Attach the Left Pedal (35) to the Left
Pedal Arm with two M6 x 20mm Screws (75) as
shown.
Attach the Right Pedal (not shown) to the Right
Pedal Arm (not shown) in the same way.
28
40
Grease
70
73
74
99
Window
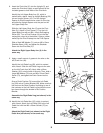
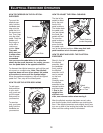
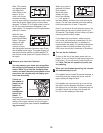
8. Insert the Pivot Axle (21) into the Upright (2), and
center the Pivot Axle. Apply a small amount of the
i
ncluded grease to both ends of the Pivot Axle.
I
dentify the Left Upper Body Arm (5), which is
marked with a decal. Insert an Upright Bushing (20)
into an Upright Spacer (19). Turn the Upright
Spacer so that the semicircular cutout is at the top,
and slide the Upright Spacer onto the post on the
Left Upper Body Arm.
Slide the Left Upper Body Arm (5) onto the Pivot
Axle (21). Attach a Pivot Spacer (17) to the Left
Upper Body Arm with an M4 x 16mm Self-tapping
Screw (82). Turn a Pivot Endcap (16) so that the
rectangular cutout is at the bottom. Using a rubber
mallet, tap the Pivot Endcap into the Pivot Spacer.
Slide a Small M8 Washer (71) onto an M8 x 19mm
Shoulder Screw (102), and tighten the Shoulder
Screw into the Pivot Axle (21).
Attach the Right Upper Body Arm (6) in the
same way.
19
17
16
82
102
71
6
Grease
Post
5
2
1
2
0
2
101
8
10
75
35
33
9