


19
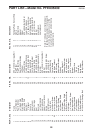
Inspect and properly tighten all parts of the exercise
cycle regularly. The exercise cycle can be cleaned
with a soft, damp cloth. To prevent damage to the
console, keep liquids away from the console and keep
the console out of direct sunlight.
TIGHTENING THE PEDALS
For best performance, regularly tighten both pedals.
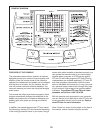
CONSOLE TROUBLESHOOTING
If the console displays flicker or darken, increase your
pedaling pace. If the console does not display your
heart rate when you use the handgrip pulse sensor,
see step 5 on page 12.
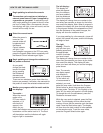
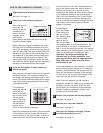
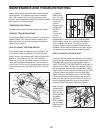
HOW TO ADJUST THE REED SWITCH
If the console does not display correct feedback, the
reed switch should be adjusted. To adjust the reed
switch, remove the indicated M4 x 48mm Screws (20)
and M4 x 16mm Screws (21) from the Left Side
Shield (4). Using an adjustable wrench, turn the Left
Pedal (40) clockwise and remove it. Turn the left arm
of the Crank (19) so that it is pointing toward the front
of the exercise cycle, and then slide off the Left Side
Shield.
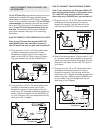
Locate the
Reed Switch
(44). Turn the
left arm of the
Crank (19)
until the
Magnet (74) is
aligned with
the Reed
Switch.
Loosen, but
do not
remove, the
indicated M4 x 16mm Screw (21). Slide the Reed
Switch slightly closer to or away from the Magnet.
Then, retighten the Screw. Turn the Crank for a
moment. Repeat until the console displays correct
feedback. When the Reed Switch is correctly adjust-
ed, reattach the left side shield and the left pedal.
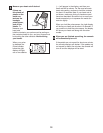
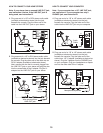
HOW TO ADJUST THE DRIVE BELT
If you can feel the pedals slip while you are pedaling,
even when the resistance is at the highest level, the
Drive Belt (68) may need to be adjusted. Refer to
HOW TO ADJUST THE REED SWITCH at the left. To
adjust the Drive Belt, the Right Side Shield (5) must
first be removed. Remove the indicated M4 x 48mm
Screws (20) from the Left Side Shield (4) and the M4
x 16mm Screws (not shown) from the Right Side
Shield. Using an adjustable wrench, turn the Right
Pedal (not shown) counterclockwise and remove it.
Next, turn the right arm of the Crank (not shown) so
that it is pointing toward the front of the exercise
cycle, and then slide off the Right Side Shield.
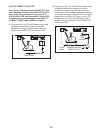
Next, turn the
indicated M8
Nylon Locknut
(56) until the
Drive Belt (68)
is properly
tightened.
Then, reattach
the right side
shield and the
right pedal.
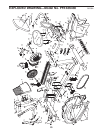
20
20
21
5
4
40
19
56
68
44
21
19
74
MAINTENANCE AND TROUBLESHOOTING