


7
2
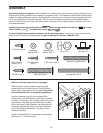
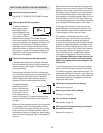
. Attach a Wheel (66) to the base of the Uprights (69) with
a Wheel Bolt (64) and a Nut (13) as shown. Do not
overtighten the Wheel Bolt; the Wheel should turn
freely.
With the help of a second person, carefully tip the tread-
mill onto its other side. See assembly step 1, and attach
the other Extension Leg (63) and the remaining two
B
ase Pads (57). Then, attach the other Wheel (66) as
described above.
With the help of a second person, carefully tip the tread-
mill down so the Uprights (69) are in a vertical position.
6
6
1
3
69
64
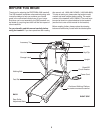
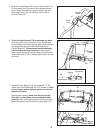
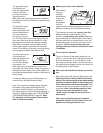
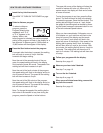
4. Identify the Right Handrail (72), which has a large hole in
the left side. Cut the plastic tie securing the Upright Wire
(42) to the right Upright (69). Feed the Upright Wire into
the hole in the bottom of the Right Handrail and out of
the large hole in the side. Note: It may be helpful to use
needlenose pliers to pull the Upright Wire out of the hole.
Press a Handrail Cap (16) onto the lower end of the
Right Handrail (72) as shown. Set the Right Handrail on
the right Upright (69) while sliding the lower end of the
Right Handrail onto the right Handrail Bracket (21).
Finger tighten a Handrail Bolt (37) with a Handrail Star
Washer (95) into the Right Handrail and the right
Upright. Next, attach the lower end of the Right Handrail
with a 3/4” Tek Screw (58) and a Small Star Washer
(24). Then, tighten the Handrail Bolt.
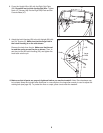
Attach the Left Handrail (71) in the same way. Note:
There is not an upright wire on the left side.
Hole
72
58
24
21
58
16
16
24
95
42
37
37
95
71
69
2
4
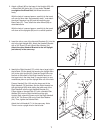
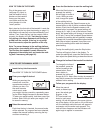
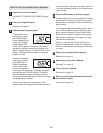
3. Insert the tab on one of the Handrail Brackets (21) into the
slot in the right Upright (69). Attach the Handrail Bracket
with a 3/4” Screw (2) and a Small Star Washer (24).
Attach the other Handrail Bracket to the left Upright
(not shown) in the same way.
2
24
69
21
Slot
3