


ASSEMBLY
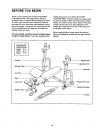
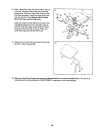
• As you assemble the weightbench, make sure all
Make Things Easier for Yourself partsare orientedas shownin the drawings.
Everythingin this manual is designedto ensure
thatthe weightbench can be assembled suc-
cessfullyby anyone. However, it is importantto
realize that theversatile weightbench has many
parts and thatthe assembly processwilltake
time. Most people findthat by settingaside plen-
fy of time, assemblywill go smoothly.
Before beginning assembly, carefully read the
following information and instructions:
• Assembly requires two persons.
• Place all parts in a cleared area and remove the
packing materials. Do not dispose of the packing
materialsuntil assemblyis completed.
• Tightenall parts as you assemble them, unless
instructedto do otherwise.
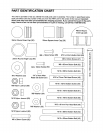
• For help identifying small parts, use the PART
TI I T.
The following tools (not included) are required
for assembly:
• Two adjustable wrenches
• One rubber mallet
• One standard screwdriver
• One Phillips screwdriver
• Lubricant, such as grease or petroleum jelly,
and soapy water.
Assemblywillbe more convenientifyou have a
socketset, a set of open-end or closed-end
wrenches, or a set of ratchetwrenches.
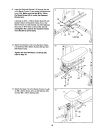
1.
Before beginning assembly, make sure that
you understand the information in the box
above. For helD identifvina small Darts. use
the PART IDENTIFICATION CHART.
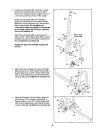
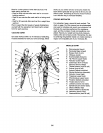
Attach a Base Foot(32) to a Stabilizer (6) with an
M4 x 16mm Screw (52).
Attach a Support (7) to the Stabilizer (6) withtwo
M10 x 93mm Button Bolts (45), an M10 Washer
(53), an M1O Nylon Locknut (56), and an M10
Nylon Jamnut (69).
Attach an UprightFoot (33) to a Stabilizer (6) with
two M10 x 68mm Button Bolts (64), four MIO
Washers (53), and two M10 Nylon Locknuts (56).
Make sure that the Bolts are inserted from the
right side. Do not tighten the Locknuts yet.
Repeat this step with the other Stabilizer (6)
and Support (7). Make sure that the M10 x
68mm Button Bolts (64) are inserted from the
left side.
64 53
33
6
53
7
[ 45
32
i 69
52
5