


Installing the Console 35
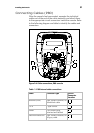
Completing the Console Installation (P80)
Before you complete the final installation steps, double-check
the connections you have made. Make sure that all cables are
fully and securely connected, and that any unneeded cables
are tied back properly.
To complete the installation:
1. Feed extra cable back into the neck tube.
2. Tilt the control console backward (toward yourself) until
the tab on the top edge of its back plate slides along the
top edge of the console mount and the screw holes align
properly.
3. Insert the four ⁵₈-inch flat head screws through the holes
in the console mount and thread them into the holes in
the back plate on the console. Partially tighten the screws
using a ⁵₈-inch hex wrench.
4. Line up the two small tabs at the top of the console’s back
cover with the slots at the top of the opening in the
console case. Insert the tabs into the slots.
5. Insert the remaining tabs on the back cover with the
corresponding slots on the console case.
6. Press gently on the edges of the back cover to snap it into
place.
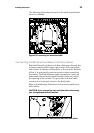
Threading the Cable Assembly (P30)
Earlier in the installation, you threaded the necessary cables
through the frame of the base unit and out the passthrough
opening in the console mount. As you line up the back plate
on the console with the console mount, you must make sure
that the cable assembly passes correctly through the
openings in both components.
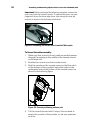
Important: Before you begin the following procedure, remove the
rear cover from the control console. Set the cover and its mounting
hardware aside for later use.
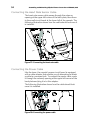
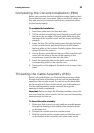
To thread the cable assembly:
1. Make sure that as much of each cable as possible passes
through the opening in the middle of the console mount
on the base unit.
2. Position the console over the console mount.
3. Rest the console on the console mount so that the notch
on the bottom of the console’s back plate rests on the