


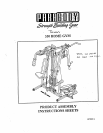
350 HOME GY3I ASSEMBLY INSTRUCTIONS
43.
44.
45.
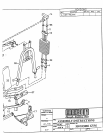
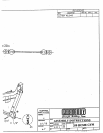
Attach the PRIMARY CABLE to the HEAD WEIGHT PLATE ASSEMBLY, by threading the
STUD into the SELECT CENTER SHAFT. Tighten jam nut against the HEAD WEIGHT PLATE
ASSEM]3LY
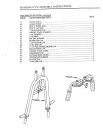
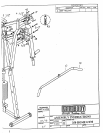
REFER TO ASSEMBLY DILl, WING #8 FOR STEPS 43 THP, U 49
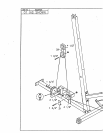
Attach (1) 3-1/2" PULLEY (#41) to the LEG CURL ARM ASSEMBLY using (1) 3/8" X I-3/4"
BOLT. and (1) 3/8" LOCK NUT.
Attach (1) 4-1/2" PULLEY (#40) to Ihe WEIGHT STACK SUPPORT BASE using (1) 3/8" X
HEX BOLT. (1) CABLE RETAINING CLIP (#31). and (1) 3/8" LOCK
Altach (1) 3-I/2" PULLEY (#41) to the LOW ROW SWIVEL BRACKET using (I) 3/8" X 1-3/4"
BOLT. and (I) 3/8" LOCK NUT.
46.
47.
49.
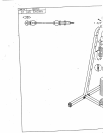
To install the SECONDARY CABLE (#39). start ~" inserting one end of the CABLE int6Lhe from
ofthe LOW ROW SWIVEL BRACKET. (REMOVE PULLEY FOR EASE OF
INSTALLATION)
¯
Pull the CABLE upward behind the PULLEY until the ball stops at the front of the LOW ROW
SWIVEL BIL~CKET.
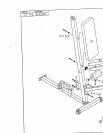
Run CABLE around the BOTTOM PULLEY of the (SUSPENDED) PULLEY/PLATE
CONNECTOR ASSEMBLY.
Pull CABLE under PULLEY on WEIGHT STACK SUPPORT BASE towards front of
MACHINE. (NOTE: BE SURE TO PLACE CABLE RETAINING "L" (#31) CLIP UNDER
PULLEY)
To finish SECONDARY CABLE INSTALLATION, run CABLE under PULLEY on the
PULLEY BtL4,CKET of the LEG CURL ARM ASSEMBLY. (REMOVE PULLEY FOR EASE
OF INSTALLATION)
Tighlma all LOOSE PULLEY and CABLE connections.
Attach the CHAIN connected to the FLOATING PULLEY BRACKET (#28) to the end of the CABLE
in the LOW ROW SWIVEL BRACKET using (I)SNAP LINK (#43).
¯
Altach L%T BAR to PRIMARY CABLE with (I) SNAP LINK (#43).
¯
Attach ( 1 )SN.~P LINK (a43) to each end of the second CHAIN (#44) to be used with either
LOW ROW PULLEY on the LEG CURL ARM ASSEMBLY or the UPPER PULLEY.
NOTE: SEE THE EXERCISE WALL CHART FOR INFORMATION (IN THE VARIOUS
ACCESSORIES THAT ATTACH TO THE SNAP LINKS.