


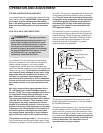


6. Make sure that all parts are properly tightened before you use the treadmill. Place a mat beneath the
treadmill to protect the floor. For your benefit, familiarize yourself with the TROUBLESHOOTING informa-
tion on pages 24 to 25.
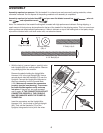
If you purchase the optional chest pulse sensor (see page
21), follow the steps below to install the re-
ceiver included with the chest pulse sensor.
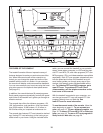
5. With the help of a second person, raise the
Frame (7) to the storage position and make sure
t
hat the latch pin is engaged as described on
page 22.
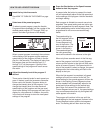
Position the Base Plate (115) on the treadmill as
shown. Attach the Base Plate with the three 2"
Bolts (114). Note: It may be helpful if a second
person tips the treadmill slightly as you tighten
the Base Plate Screws.
Carefully lower the Frame (7) to the floor as de-
scribed on page 23.
115
7
114
5
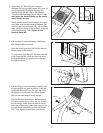
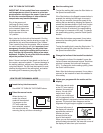
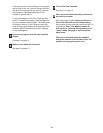
1. Make sure that the power cord is unplugged.
Remove the indicated Screws (6) from the
Console Base (88).
Important: The Screws (6) may be different
lengths. Keep track of which Screws were re-
moved from which holes.
2. Peel the paper off the pad on the bottom of the
Receiver (A).
Turn the Receiver so the cylin-
der is on the side shown, and press the
Receiver into the bottom of the Console Frame
(120) in the indicated location.
2
120
A
Cylinder
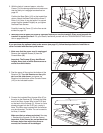
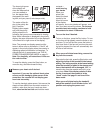
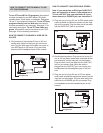
3.
Connect the included Short Jumper Wire (E) to
the wire on the Receiver (B). Connect the other
end of the Short Jumper Wire to the PLS2 jack
on the back of the Console (C). If there is a wire
already plugged into the PLS2 jack, unplug it.
Note: The other wires included with the receiver
may be discarded. The Wire Tie can be used to
tie wires, if needed.
Make sure that no wires are pinched. See step
1. Reattach the Console (C) with the Screws.
Important: If the Screws are not put back into
the same holes from which they were re-
moved, the Console will be damaged.
3
C
B
E
8
88
88
6
1
PLS2
Jack