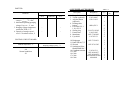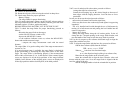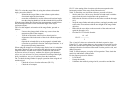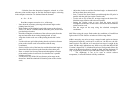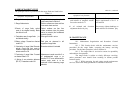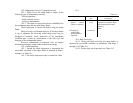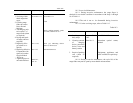
Table 4.1, continued
Description Designation Qnty
Serial
No.
Remarks
19. Cable
20. Eraser
21. Cloth
22. Charging device
23. Protection device
Materials
24. Silica gel, indicating
GOST 8984-75
Package
25. Package
26. Package
27. Package
28. Casing
29. Casing
30. Cover
31. Cover
32. Cover
Documents
33. Operating
Instructions
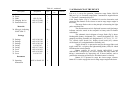
AEP 48.44.120
G61.93.516
AEP 43.79.608
AEP 43.79.607
AEP 42.86.186
AEP 42.83.368
AEP 42.86.184
G 42.62.345
AEP 45.71.018
AEP 42.63.021
AEP 42.63.030
G 42.63.332
AEP 36.28.001 РE
1
1
2
1
1
50 g
1
1
1
1
1
1
1
1
1
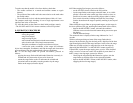
5. APPEARANCE OF THE DEVICE
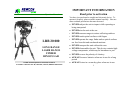
5.1. As it is set up for operation, binoculars range finder LRB 20
000 (see Fig.1) is essentially range finder 1 mounted on Angular Mount
2 . The latter is mounted on tripod 3.
5.1.1. Range finder (Fig.2) is intended for terrain observation and
measuring the distance to the closest or next-in range target caught in
the beam.
The range finder works on the principle of measuring the light
pulse round-trip time.
The measurement result is displayed in meters on digital range
indicator and also stored in the computer in binary code for further
calculations.
The schematic circuit diagram of range finder (Fig.3) shows
Rechargeable battery designated (G1), controls designated (S1- S4),
pumping and firing elements (ref. designations C1-C3, E1, L1, T1, V1-
V2), control circuit board (A1), display circuit board (A2), counter
circuit board (A3), and photodetector assembly (A4).
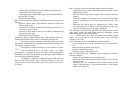
Toggle switch S1 is operated to energize the range finder, and
toggle switch S4 – to light up the light-emitting diode (LED) H1 which
illuminates the reticule pattern.
Button switches S2 and S3 labeled (MEASURE 1) and
(MEASURE L) respectively are used to prepare the range finder for
taking a measurement (by depressing one of those buttons), and to
perform the measuring operation (for which the button is released).
Button S2 is operated to range the closest target, whereas
button S3 is used to engage the next-in-range target caught in the beam.


