


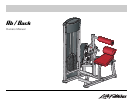
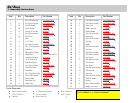
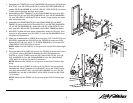

7
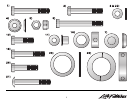
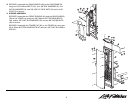
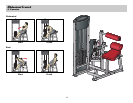
11. Wrap the ball end of the CABLE (8) around one 4-1/2" PULLEY (9) and
SECURELY assemble the PULLEY to the FORWARD PIVOT ARM (L) as
shown using one 3/8 X 46mm BOLT (39), one PULLEY COVER (28), one
3/8" SAE WASHER (3), one 3/8" RH WASHER (4) and one RH CAP (7).
NOTE: Make sure the CABLE is in the groove of the PULLEY and the
PULLEY COVER is positioned correctly (as shown), before tightening.
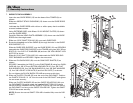
Wrap the ball end of the CABLE (8) around one 4-1/2" PULLEY (9) and
SECURELY assemble the PULLEY to the REARWARD PIVOT ARM (M) as
shown using one 3/8 X 46mm BOLT (39), one PULLEY COVER (28), one
3/8" SAE WASHER (3), one 3/8" RH WASHER (4) and one RH CAP (7).
NOTE: Make sure the CABLE is in the groove of the PULLEY and the
PULLEY COVER is positioned correctly (as shown), before tightening.
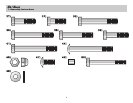
Attach the ball end of the CABLE (8) to the CAM FRAME (B) as shown
using one 3/8 X 40mm BOLT (10), two 3/8" SAE WASHERS (3) and one
3/8" LOW HT LOCK NUT (5).
Verify the cable has been routed according to the illustration shown
below.
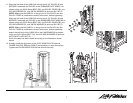
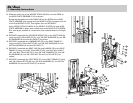
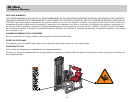
12. Visually check the alignment of the PIVOT ARM PULLEYS and the
TOWER PULLEYS. Slide the CAM (F) as necessary to align the pulleys.
Tighten the PILLOW BLOCK COLLAR set screws securely.