


11
H
OW TO POSITION AND STABILIZE THE LIFE FITNESS TREADMILL
Following all safety instructions in Section 1.1, move
the treadmill to the location in which it will be used. See
Section 7, titled Specifications, for the dimensions of
the footprint. Allow a distance of eight inches, or 21
centimeters, between the treadmill and other units on
either side. Allow a distance of six feet, or two meters,
from the rear of the treadmill to any object or surface.
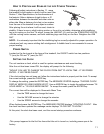
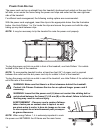
After placing the unit where it will be used, check its
stability. If there is even a slight rocking motion or the unit is not stable, determine which stabilizing
leg is not resting on the floor. To adjust, loosen the JAM NUT (A), and turn the STABILIZING LEG (B)
until the rocking motion ceases, and both stabilizing legs rest firmly on the floor. Retighten the JAM
NUT.
NOTE: It is extremely important that the stabilizing leg be correctly adjusted for proper operation. An
unbalanced unit may cause striding belt misalignment. A bubble level is recommended to ensure
proper leveling.
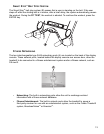
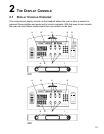
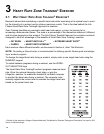
POWER SWITCH
Located on the front panel at the base of the treadmill, the ON/OFF switch has two positions:
"I" (one) for ON and "0" (zero) for OFF.
SETTING THE CLOCK
The unit contains a clock, which is used for system maintenance and event tracking.
After the unit has been turned ON, the display will prompt for the following:
"WOULD YOU LIKE TO CHANGE THE CLOCK FROM GMT TO LOCAL TIME - IF YES PRESS
ENTER - IF NO PRESS CLEAR"
If the clock setting has not been set, follow the instructions below to properly set the clock. To accept
the current settings, press the CLEAR key.
To change the setting, press the ENTER key. The MESSAGE CENTER displays: "CHOOSE CLOCK
DISPLAY MODE BY USING ARROW KEYS". Use an ARROW key to toggle the settings between "24
HOUR MODE" or "12 HOUR MODE AM/PM". To accept the mode, press the ENTER key.
The current time will be displayed in Greenwich Mean Time.
• Use the TIME arrows to change the hours
• Use the INCLINE arrows to change the minutes
• Use the SPEED arrows to change the seconds
When finished press the ENTER key. The MESSAGE CENTER displays "UPDATING CLOCK". After
the clock has been updated the message center displays "CLOCK SET TO LOCAL".
At this point, the clock has been reset, and the normal startup procedure continues.
†
This prompt appears for the first five times that the unit is turned on, including power-ups at the
factory.