


Page
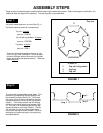
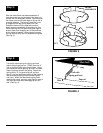
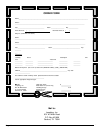
Step 5:
Lay the jumping mat (bed) (part no. JTR6B)
inside the frame. Springs are used to support the
mat (bed) and are connected between “V” rings
on the mat (bed) and holes in the top frame rail.
There are 48 “V” rings on the mat (bed) that have
to line up with corresponding holes on the top
frame rail. These are not numbered. To make
sure they eventually all line up, pick an arbitrary
point and call it zero or 12 o’clock. Connect a
spring between the “V” ring and the frame hole at
this point (See Fig. 5).
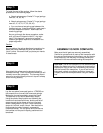
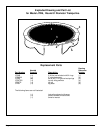
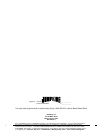
Step 6:
Now count 12 holes and “V” rings in a clockwise
direction. Attach a spring. You should be at hole 12
or 3 o’clock. Count another 12 holes and “V” rings in
a clockwise direction. Attach a spring. You should
be at hole 24 or 6 o’clock. Count another 12 holes
and “V” rings clockwise and attach a spring. You
should be at hole 36 or 9 o’clock. At this point, you
should have 4 springs installed at 12, 3, 6, and 9
o’clock (See Fig. 6). This equal tension procedure is
essential to properly attach the mat (bed) to the
frame.
6
Top rail
12 o'clock
FIGURE 5
Clockwise
12 o'clock
3 o'clock
9 o'clock
FIGURE 6
Hole numbers:
6 o'clock
Mat (bed)
Mat (bed)
36
24
12
0