


Page
Step 3:
5
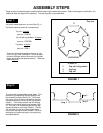
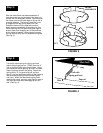
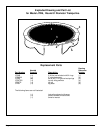
After the metal frame has been assembled it
must be turned over so the base of the legs is in
contact with the assembly surface. Stand outside
the frame circle and lift one edge of the top rail to
a vertical position. The frame is now like a coin
on edge with the legs facing away from you.
Rotate the frame until the legs face you and
slowly lower the assembly to the ground or floor.
When lowering the unit, grab both upper legs to
prevent them from dropping out of their sockets
as the frame is lowered. Now check all connec-
tions to see that they are fully seated and aligned
(See Fig. 3).
Step 4:
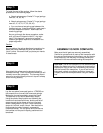
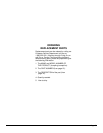
It is best to use a spring as a tool to pull and
attach the springs (part no. JTR6S) from the “V”
ring on the bed (mat) to the frame holes. Using
your hand can lead to getting “pinched” and also
doesn’t properly tension the spring. Attach the
spring to the “V” ring and using the “pull tool
spring", pull the attachment spring to the frame by
inter-connecting spring hooks and pulling with
one hand. When the attachment spring hook
reaches the frame, use your other hand to push it
into the frame hole while disengaging the “pull
tool” (See Fig. 4).
"V" ring
Pull with
spring pull tool
Top rail
Hole
Mat (bed)
Mat (bed)
FIGURE 4
FIGURE 3
FRAME
ASSEMBLED
LIFT
ROTATE
LOWER