


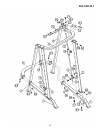
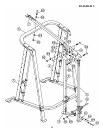
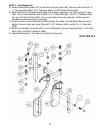
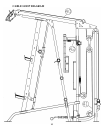
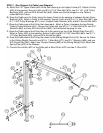
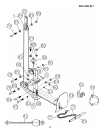
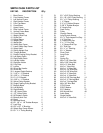
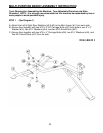
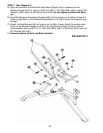
STEP 7 (See Diagram 7 & Cable Loop Diagram)
A.) Insert the tip of the 127” Lower Cable (#41) through the opening on the Foot Plate (#26)
to the opening on the Vertical Frame Base (#9).
B.) Attach a Small Pulley (#58) to the opening. Attach the Foot Plate to the Frame. Align the
holes and secure the Foot Plate, Vertical Frame Base, and the Small Pulley with one M10
x 2 ¾” Allen Bolt (#93), two Ø 1” x ¾” Pulley Bushings (#53), and one M10 Aircraft Nut
(#90). Secure the Foot Plate to the Vertical Frame Base with one M10 x 2 ½” Carriage
Bolt (#84), Ø ¾” Washer (#89), and M10 Aircraft Nut (#90).
C.) Draw the Cable underneath the Pulley to the open bracket on the Vertical Frame Base.
Install a Pulley (#59) with a M10 x 1 ¾” Allen Bolt (#78), two Ø
¾” Washers (#89) and one
M10 Aircraft Nut (#90).
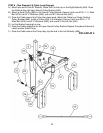
D.) Draw the Cable around the Pulley then upward to the Double Floating Pulley Bracket
(#21) previously installed in Step-5. Install another Pulley with one M10 x 1 ¾” Allen Bolt
(#78), two Ø ¾” Washers (#89), and one M10 Aircraft Nut (#90). Note: After finishing the
entire cable assembly, come back to this step and adjust the tension of the cables. To
increase the tension, move up the Pulley on the Double Floating Pulley Brackets. To
decrease the tension, move the Pulley down.
E.) Draw the Cable around the Pulley then downward to the open bracket on the back of the
Rear Vertical Frame (#8). Install another Pulley.
F.) Draw the Cable around the Pulley and upward to the Single Floating Pulley Bracket (#36)
previously installed in Step-6. Secure the Cable to the Bracket with one M10 x 1” Allen
Bolt (#77), two Ø ¾” Washers (#89), and one M10 Aircraft Nut (#90).
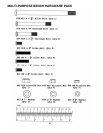
G.) Connect the Long Chain (#71) to the Cable with a C-clip (#72). Depends on the exercise,
connect the Shiver Bar (#29), Ankle Strap (#91), or Single Handle (#92) to the Long
Chain with another C-clip.
16