


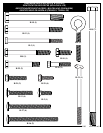

20
P/N 21401401 12/05
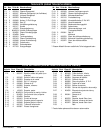
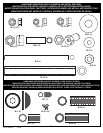
Wood Scrap (NOT SUPPLIED)
Chute de bois (NON FOURNIE)
Holzstück (NICHT IM
LIEFERUMFANG ENTHALTEN)
Trozo de madera
(NO SE SUMINISTRA)
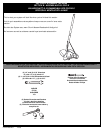
W
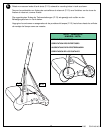
hile maintaining alignment, bounce middle pole section (P-2) into top section
(P-1) using a wood scrap as shown until the top pole no longer moves toward the
p
ole identification sticker on the middle pole.
Tout en maintenant l'alignement, entrechoquez les sections de poteau supérieure (P-2)
et centrale (P-1) en utilisant une chute de bois, comme illustré, jusqu'à ce que la section
supérieure ne bouge plus vers l'étiquette d'identification de poteau située sur la section
centrale.
Unter Wahrung der korrekten Ausrichtung das mittlere Stangenteil (P-1) wie gezeigt mit
einem Holzstück in das obere Stangenteil (P-2) hineinklopfen, bis sich das obere
Stangenteil nicht mehr auf die Stangenmarkierung am mittleren Stangenteil zubewegt.
Mientras mantiene la alineación, golpee la sección media del poste (5) en la sección
superior (4) usando un trozo de madera, como se muestra, hasta que la sección
superior del poste ya no se mueva hacia la calcomanía de identificación que se
encuentra en la sección media del poste.
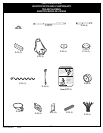
TROUGH
TROUGH
GORGE
RINNE
CANAL
TROUGH
GORGE
RINNE
CANAL
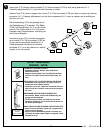
Align dimple of top pole section (P-1) into trough of
middle pole section (P-2) as shown.
Alignez le petit renfoncement de la section de poteau
supérieure (P-1) dans la gorge de la section de poteau
centrale (P-2), comme illustré.
Die Ausbuchtung im oberen Stangenteil (P-1) wie gezeigt
mit der Rinne im mittleren Stangenteil (P-2) ausrichten.
Alinee la concavidad de la sección superior del poste (P-
1) con la depresión de la sección media del poste (P-2)
como se muestra.
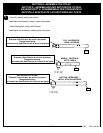
IMPORTANT! / IMPORTANT!
WICHTIG! / ¡IMPORTANTE!
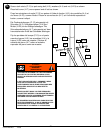
HOLE
TROU
LOCH
ORIFICIO
DIMPLE
RENFONCEMENT
EINBUCHTUNG
CONCAVIDAD
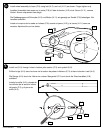
THE IDENTIFICATION STICKER IS
LOCATED 5" FROM THE END OF THE
POLE. WHEN PROPERLY POUNDED
TOGETHER, THE POLE SECTIONS
SHOULD HAVE A 3-1/2" MINIMUM
OVERLAP, LEAVING 1-1/2" BETWEEN THE
OVERLAPPING POLE AND THE
IDENTIFICATION STICKER.
L'ÉTIQUETTE D'IDENTIFICATION SE
SITUE À 12,7 CM DE L'EXTRÉMITÉ DU
POTEAU. LORSQU'ELLES SONT
CORRECTEMENT EMBOÎTÉES LES UNES
DANS LES AUTRES, LES SECTIONS DE
P
OTEAU DOIVENT SE CHEVAUCHER DE 9
CM MINIMUM, EN LAISSANT 3,8 CM
ENTRE LA SECTION QUI CHEVAUCHE ET
L'ÉTIQUETTE D'IDENTIFICATION.
D
ER MARKIERUNGSAUFKLEBER IST IN
EINER ENTFERNUNG VON CA. 12,7 CM
VOM STANGENENDE ANGEBRACHT.
WENN DIE STANGENTEILE RICHTIG
ZUSAMMENGESTAUCHT WURDEN,
SOLLTEN SIE EINANDER UM
MINDESTENS 9 CM ÜBERLAPPEN. DER
ABSTAND ZWISCHEN DEM
ÜBERLAPPENDEN STANGENTEIL UND
DEM MARKIERUNGSAUFKLEBER SOLLTE
ALSO 3,8 CM BETRAGEN.
LA CALCOMANÍA DE IDENTIFICACIÓN
ESTÁ COLOCADA A 12.7 CM (5") DEL
EXTREMO DEL POSTE. CUANDO ESTÁN
ADECUADAMENTE EMBRAGADAS, LAS
SECCIONES DEL POSTE DEBEN TENER
UN TRASLAPE MÍNIMO DE 8.9 CM (3 1/2"),
DEJANDO 3.8 CM (1 1/2") ENTRE EL
POSTE TRASLAPADO Y LA CALCOMANÍA
DE IDENTIFICACIÓN.
CAUTION!
A
TTENTION!
VORSICHT!
¡PRECAUCIÓN!
5"
TROUGH
TROUGH
TROUGH
middle pole
1-1/2"
I
D
STICKER
ÉTIQUETTE
D'IDENTIFICATION
MARKIERUNGSAU
FKLEBER
CALCOMANÍA DE
IDENTIFICACIÓN
P-2
P-1
P-2
P-1
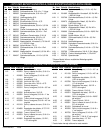
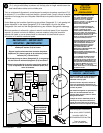
IMPORTANT! / IMPORTANT!
WICHTIG! / ¡IMPORTANTE!
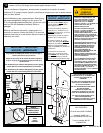
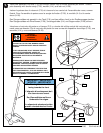
Position middle pole so that the warning
label is on the same side as the holes
indicated of the top pole.
Placez la section de poteau centrale de
sorte que l'étiquette d'avertissement se
situe du même côté que les trous indiqués
en haut du poteau.
Das mittlere Stangenteil so positionieren,
dass sich der Warnaufkleber auf der
gleichen Seite wie die Löcher im oberen
Stangenteil befinden.
Coloque la sección media del poste de
manera que la etiqueta de advertencia
quede del mismo lado que los orificios
indicados en la sección superior del poste.
P-2
P-1
middle pole
2.