


8
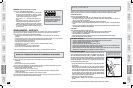
INTRODUCTION
IMPORTANT
PRECAUTIONS
BEFORE
YOU BEGIN
TREADMILL
OPERATION
LIMITED
WARRANTY
TROUBLESHOOTING
& MAINTENANCE
CONDITIONING
GUIDELINES
ASSEMBLY
BEFORE
YOU BEGIN
ASSEMBLY
9
INTRODUCTION
IMPORTANT
PRECAUTIONS
TREADMILL
OPERATION
CONDITIONING
GUIDELINES
TROUBLESHOOTING
& MAINTENANCE
LIMITED
WARRANTY
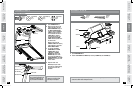
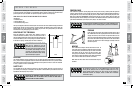
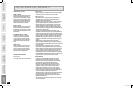
BOLT (A)
20 mm
Qty: 6
FLAT WASHER (B)
8 mm
Qty: 4
SPRING WASHER (C)
8 mm
Qty: 6
ARC WASHER (D)
8 mm
Qty: 2
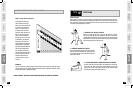
Open HARDWARE BAG 1.
Slide LEFT CONSOLE MAST into MAIN
FRAME BRACKET.
Insert 2 BOLTS (A), 2 SPRING WASHERS
(C) and 2 FLAT WASHERS (B) from the
bottom outside of the mast to secure
the CONSOLE MAST to the MAIN
FRAME BRACKET.
Insert 2 BOLTS (A), 2 SPRING WASHERS
(C) and 2 FLAT WASHERS (B) from the
bottom inside of the mast to secure the
CONSOLE MAST
to the MAIN FRAME
BRACKET.
Insert 2 BOLTS (A), 2 SPRING WASHERS
(C) and 2 ARC WASHERS (D) from
the front of the mast to secure the
CONSOLE MAST to the MAIN FRAME
BRACKET.
A
B
C
D
E
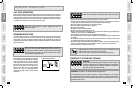
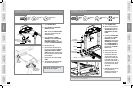
Disassemble box and remove the cardboard packaging that is not beneath the treadmill. Do not attempt
to lift the treadmill at this time. Remove plastic wrap from console masts.
*NOTE:
During each assembly step, ensure that ALL nuts and bolts are in place and partially threaded
in before completely tightening any ONE bolt. A light application of grease may aid in the installation of
hardware. Any grease, such as lithium bike grease is recommended.
P RE-AS SE M BLY
MAIN FRAME BRACKET
LEFT CONSOLE MAST
BOLTS (A)
FLAT WASHERS (B)
ARC WASHERS (D)
SPRING WASHERS (C)
SPRING WASHERS (C)
BOLTS (A)
FLAT WASHERS (B)
SPRING WASHERS (C)
BOLTS (A)
AS SE MB LY ST E P 1
HARDWARE BAG 1 CONTENTS:
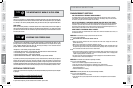
AS SE MB LY ST E P 2
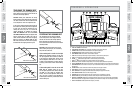
RIGHT CONSOLE MAST
LEAD WIRE
CONSOLE CABLE
MAIN FRAME BRACKET
RIGHT CONSOLE MAST
BOLTS (A)
FLAT WASHERS (B)
ARC WASHERS (D)
SPRING WASHERS (C)
SPRING WASHERS (C)
BOLTS (A)
FLAT WASHERS (B)
SPRING WASHERS (C)
BOLTS (A)
CONSOLE CABLE
BOLT (A)
20 mm
Qty: 6
FLAT WASHER (B)
8 mm
Qty: 4
SPRING WASHER (C)
8 mm
Qty: 6
ARC WASHER (D)
8 mm
Qty: 2
HARDWARE BAG 2 CONTENTS:
Pull LEAD WIRE through RIGHT
CONSOLE MAST.
After pulling the lead wire through
the mast, the top of the console cable
should be located at the top of the
mast. Detach and discard lead wire.
Open HARDWARE BAG 2.
Slide RIGHT CONSOLE MAST into MAIN
FRAME BRACKET.
NOTE: Do not pinch CONSOLE CABLE
when placing the mast onto the main
frame.
Insert 2 BOLTS (A), 2 SPRING
WASHERS (C) and 2 FLAT WASHERS
(B) from the bottom outside of the
mast to secure the CONSOLE MAST to
the MAIN FRAME BRACKET.
Insert 2 BOLTS (A), 2 SPRING
WASHERS (C) and 2 FLAT WASHERS
(B) from the bottom inside of the mast
to secure the CONSOLE MAST to the
MAIN FRAME BRACKET.
Insert 2 BOLTS (A), 2 SPRING
WASHERS (C) and 2 ARC WASHERS (D)
from the front of the mast to secure
the CONSOLE MAST to the MAIN
FRAME BRACKET.
A
B
C
D
E
F
NOTE: Do not completely tighten
any screws or bolts until step 6 is
complete!
NOTE: Do not completely tighten
any screws or bolts until step 6 is
complete!
T1201_Rev.1.7.indd 8-9 7/31/08 4:52:34 PM