


11
INTRODUCTION
IMPORTANT
PRECAUTIONS
ASSEMBLY
BEFORE
YOU BEGIN
TREADMILL
OPERATION
CONDITIONING
GUIDELINES
TROUBLESHOOTING
& MAINTENANCE
LIMITED
WARRANTY
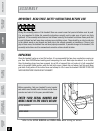
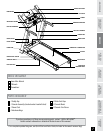
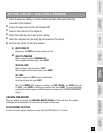
Y O U ’ R E F I N I S H E D !
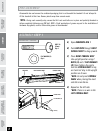
A S S E M B LY S T E P 5
SCREW (F)
CONSOLE TRIM PIECE
SCREW (F)
12 mm
Qty: 6
HARDWARE BAG 5 CONTENTS :
A) Open HARDWARE BAG 5.
B) Place left CONSOLE TRIM PIECE
onto the CONSOLE.
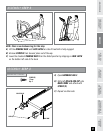
C) Place 3 SCREWS (F) into side of
left CONSOLE TRIM PIECE and
tighten.
D) Repeat step C above to secure
the right CONSOLE TRIM PIECE
to the CONSOLE.
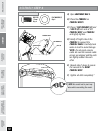
E) Connect power plug to the
treadmill and connect the cord to
a power outlet. The on/off switch
is located next to the power
cord. Flip this switch to the ‘ON’
position, so that the switch is
lit. You will hear a beep and the
console will light up.