


BEFORE
YOU BEGIN
24
INTRODUCTION
IMPORTANT
PRECAUTIONS
ASSEMBLY
BEFORE
YOU BEGIN
BIKE
OPERATION
LIMITED
WARRANTY
TROUBLESHOOTING
& MAINTENANCE
CONDITIONING
GUIDELINES
ASSEMBLY
BIKE
OPERATION
BEFORE
YOU BEGIN
ASSEMBLY
25
INTRODUCTION
IMPORTANT
PRECAUTIONS
BIKE
OPERATION
CONDITIONING
GUIDELINES
TROUBLESHOOTING
& MAINTENANCE
LIMITED
WARRANTY
BIKE
OPERATION
ASSEMBLY
INTRODUCTION
Research shows that those who journal their fitness routines or workouts, on average, achieve
greater success than those who do not. Because your new bike is equipped with Horizon’s exclusive
eTRAK™ Performance Tracker, you’ve taken an important step towards achieving your fitness goals.
Congratulations!
eTRAK™ is an innovative new software, integrated into your bike console, that will allow you to track
your fitness progress over time, without the need for paper journals or logs. eTRAK™ allows you to
easily compare your current workout to your last, average or lifetime workout totals. With quick access to
feedback like duration of workout or calories burned during previous workouts, you’ll be able to quickly
and easily see the progress you’ve made. Read further to learn about how eTRAK™ can help motivate
you to enhance your performance.
U S I N G e T R A K ™ PE R F O R M AN C E T R A C K E R
e T R A K ™ O P E R ATI O N
W O R K O U T I N F O R M ATI O N
SETUP: To activate eTRAK™ a user MUST be chosen before the program begins. To select a user, simply
press the User 1 or User 2 button. To deselect a user, press User button again. All accumulated data
specifically relates to the user that is chosen.
Note: If no user is selected and clock and date are not set, only lifetime data will be tracked. To set clock
and date see page 16.
RESET: Reset all recorded information for User 1 or User 2 by selecting the user and then holding down the
user button for 10 seconds. Note: This step is permanent and will delete ALL previously accumulated data for
the chosen user.
ACCUMULATED DATA: Once eTRAK™ is activated, you can scroll through your accumulated data in multiple
formats by pressing the eTRAK™ button. A workout is saved when: the program ends, the console is
paused and not resumed within ten minutes, or the stop button is held to reset the console.
CURRENT WORKOUT: The console automatically defaults to Current Workout, displaying your progress
in real time.
AVERAGE WORKOUT: This option allows you to see your average accumulated data for the last 30
workouts. The following information will be shown in each display window:
TIME - Average workout time.
CALORIES - Average calories burned.
DISTANCE - Average workout distance.
SPEED - Average speed of workout.
RPM - Average RPM of workout.
WATTS - Average Watts of workout.
PACE - Average Pace of workout.
1.
2.
W O R K O U T I N F O R M ATI O N
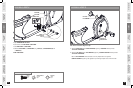
DOCK INSERT
POCKET LIP
Align iPod
®
dock insert to rest on top of the pocket lip.
NOTE: If you push the insert further into the pocket your
iPod will not fit.
U S I N G S P E A K E R / M P 3 AU DI O F U N C T I O N
1) Connect the included AUDIO ADAPTOR CABLE to the AUDIO IN JACK on the top of the CONSOLE and the
HEADPHONE JACK on your CD / MP3 player.
2) Use your CD / MP3 player buttons to adjust song settings.
NOTE: If you don’t want to use the speakers, you can plug your headphones into the AUDIO OUT JACK at
the bottom of the CONSOLE.
3) Remove the AUDIO ADAPTOR CABLE when not in use.
iPod
®
DOCKING STATION (iPod
®
NOT INCLUDED)
The Horizon Performance iPod
®
Docking Station is the ultimate iPod
®
docking solution for your workouts.
Various models of iPod
®
with a dock connector can fit in the iPod
®
Docking Station with the use of
interchangeable inserts. This Docking Station includes different inserts.
Using your iPod
®
Docking Station
1) Remove rubber plug from bottom of DOCKING STATION.
2) Place the proper insert that fits your iPod
®
model into the DOCKING STATION.
See image below for dock insert instructions.
3) Plug in your iPod
®
by matching the dock connector pin on the elliptical with
the dock connector on your iPod
®
.
NOTE: If you want to connect a different-size iPod
®
, simply lift out the insert
and replace with a new one.
4) Use the iPod
®
controls on the bottom of the CONSOLE to adjust volume and
song settings.
NOTE: If you don’t want to use the speakers, you can plug your headphones
into the AUDIO OUT JACK at the bottom of the CONSOLE.
5) Replace the rubber plug into the bottom of the DOCKING STATION when the
station is not in use.
NOTE: iPod® audio will not play through speakers if audio adaptor cable is
plugged in while iPod® is in the DOCKING STATION.
DOCK INSERT
POCKET LIP
Universal MP3 Player
Dock Insert
iPod
®
Dock Inserts
Note: Dock insert sizes
vary for each iPod.
B600_Rev.1.6.indd 24-25 7/11/07 1:32:04 PM