


12
HOW TO USE THE PRESET PROGRAMS
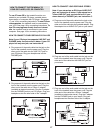
Insert the key into the console.
See HOW TO TURN ON THE POWER on page 10.
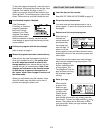
Select one of the six preset programs.
When the key is
inserted, the
manual mode
will be selected
and the manual
indicator will
light. To select
one of the pre-
set programs,
press the Select
Workout button repeatedly until one of the six
preset program indicators lights.
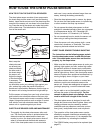
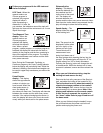
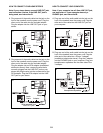
The profiles on the console show how the speed
and incline of the treadmill will change during the
preset programsÑthe white profiles show speed
settings and the green lines show incline settings.
The numbers at the left ends of the profiles show
the speed and incline ranges for the programs.
During the Healthwalk program, for example, the
speed of the walking belt will vary from 2 mph to 4
mph and the incline will vary from 0% to 6%. The
program display will
show a simplified pro-
file of the program. The
Time/Segment Time
display will show how
long the selected pro-
gram will last.
Put on the chest pulse sensor if desired.
For the Pulse/Calories display to show your heart
rate, the chest pulse sensor must be worn. To put
on the chest pulse sensor, see page 6.
Press the Start button or the Speed
▲▲
button
to start the program.
A moment after the button is pressed, the tread-
mill will automatically adjust to the first speed and
incline settings for the program. Hold the handrails
and begin walking.
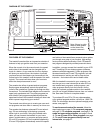
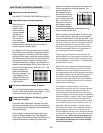
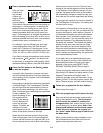
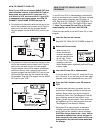
Each program is divided into several time seg-
ments of different lengths. The Time/Segment
Time display shows both the time remaining in the
program and the time remaining in the current
segment. One speed setting and one incline set-
ting are programmed for each segment. The
speed setting for the
first segment will be
shown in the flashing
Current Segment col-
umn of the program dis-
play. (The incline set-
tings are not shown in
the program display.)
The speed settings for
the next seven segments will be shown in the
seven columns to the right.
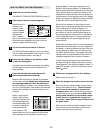
When only three seconds remain in the first seg-
ment of the program, both the Current Segment
column and the column to the right will flash, a se-
ries of tones will sound, and all speed settings will
move one column to the left. The speed setting for
the second segment will then be shown in the
flashing Current Segment column and the tread-
mill will automatically adjust to the speed and in-
cline settings for the second segment.
The program will continue in this way until the
speed setting for the last segment is shown in the
Current Segment column and no time remains in
the Time/Segment Time display. The walking belt
will then slow to a stop.
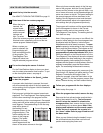
Note: Each time a segment ends and the speed
settings move one column to the left, if all of the
indicators in the Current Segment column are lit,
the speed settings will move downward so that only
the highest indicators in the columns will appear in
the program display. When the speed settings
move to the left again and not all of the indicators
in the Current Segment column are lit, the speed
settings will move back up.
If the speed or incline setting for the current
segment is too high or too low, you can manually
override the setting by pressing the Speed or
Incline buttons on the console. Every few times
one of the Speed buttons is pressed, an additional
indicator will light or darken in the Current Segment
column. If any of the columns to the right of the
Current Segment column have the same number
of lit indicators as the Current Period column, an
additional indicator will light or darken in those
columns as well. Note: If you manually adjust the
speed setting so that all of the indicators in the
Current Segment column are lit, the speed settings
in the program display will not move downward as
described above. When the current segment of
the program ends, the treadmill will automati-
cally adjust to the speed and incline settings
for the next segment.
4
3
2
1
Current Segment