


7
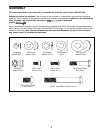
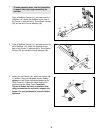
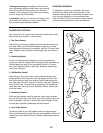
9. The Console (12) requires one “AAA” battery (not
included); an alkaline battery is recommended.
Carefully pry the Console away from the Upper
Console Shroud (13) as shown. Be careful not to
dislodge the reed switch wire. Insert the battery
into the holder on the back of the Console. Make
sure that the battery is oriented as shown by
the diagram on the back of the Console. Then,
reinsert the Console into the Console Shroud.
12
Reed Switch Wire
13
9
7
39
40
60
60
3
9
9
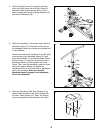
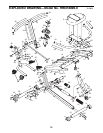
7. Orient a Seat Handlebar (9) as shown. Attach the
Seat Handlebar to the Seat Carriage (3) with two
M8 x 40mm Button Bolts (39), two M8 Curved
Washers (60), and two M8 Nylon Locknuts (40).
Repeat this step for the other Seat Handlebar (9).
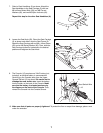
8. Loosen the Seat Knob (29). Orient the Seat Carriage
(3) as shown and slide it onto the Seat Frame (2).
Attach the Seat Carriage with an M6 x 10mm Screw
(55) and an M6 Spring Washer (56). Then, slide the
Seat Carriage forward or backward to the desired
position and retighten the Seat Knob.
2
3
56
29
55
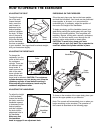
10. Make sure that all parts are properly tightened. To protect the floor or carpet from damage, place a mat
under the exerciser.
8