


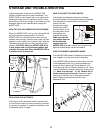


7
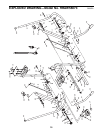
5. Attach the Right Pedal Cover (27) to the lower
end of the Right Leg (4) with four #8 x 1/2Ó
Screws (21).
Attach the Left Pedal Cover (26) to the Left Leg
(3) in the same manner.
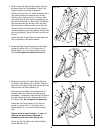
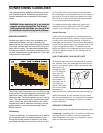
8. Slide one of the Handles (13) onto the Left Leg
(3). Attach the Handle to the Left Leg with two
1/4Ó x 1 1/2Ó Bolts (63), two 1/4Ó Lock Washers
(39), and two 1/4Ó Nylon Locknuts (62).
Attach the other Handle (13) to the Right Leg (4)
in the same manner.
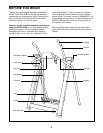
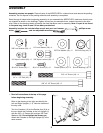
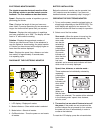
7. Remove the two indicated #8 x 3/4Ó Screws (23)
from the Right Upright (2). Attach the Monitor
Bracket (45) to the Right Upright with the Screws.
Slide the Electronic Monitor (37) onto the Monitor
Bracket until the tab on the back of the Monitor
snaps into the hole in the Monitor Bracket.
Remove the #8 x 1/2Ó Monitor Screw (48) from
the Monitor Bracket (45). Attach the reed switch to
the Monitor Bracket with the Monitor Screw. Note:
If the Electronic Monitor (37) does not operate
properly, see HOW TO ADJUST THE REED
SWITCH on page 11.
45
Reed
Switch
48
23
2
37
27
26
21
3
4
Fig. 7
Fig. 5
13
63
39
39
62
3
4
13
Fig. 8
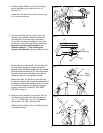
6. The Electronic Monitor (37) requires two ÒAAÓ
batteries (not included). Alkaline batteries are
recommended. Press the tab on the Battery
Cover (47) and remove the Battery Cover from
the Monitor. Insert two batteries into the Monitor.
Make sure that the negative ends of the
batteries (marked ÒÐÓ) are touching the
springs in the Monitor. Close the Battery Cover.
Fig. 6
37
47
Tab
AA
Batteries