


Inspect and tighten all parts of the AEROFLYER
regularly. Replace any worn parts immediately. The
AEROFLYER can be cleaned with a soft, damp cloth.
Keep liquids away from the electronic monitor. Keep
the monitor out of direct sunlight or the display may be
damaged. Remove the batteries when storing the
AEROFLYER.
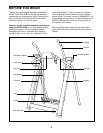
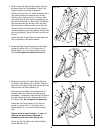
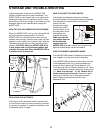
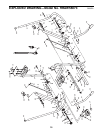
HOW TO FOLD THE AEROFLYER FOR STORAGE
When the AEROFLYER is not in use, it should be fold-
ed to the compact storage position. To fold the
AEROFLYER, first remove the lock knobs and lock
washers from the legs. Insert the lock knobs and lock
washers into the holes in the crossbar. Next, hold the
resistance dials and fold the frame and the uprights
together. CAUTION: When the AEROFLYER is not
in use, always fold it to the storage position and
unbuckle the nylon belt. Place the AEROFLYER in
a location where it cannot fall.
REPLACING THE BATTERIES
If the display of the electronic monitor becomes dim,
or if the monitor does not function properly, the batter-
ies should be replaced. To replace the batteries, refer
to assembly step 6 on page 7.
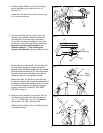
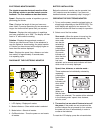
HOW TO ADJUST THE REED SWITCH
If the speed and distance modes do not display
correct information, the reed switch should be adjusted.
The reed switch is located below the electronic
monitor (see the
drawing at the right).
Loosen the screw in
the reed switch, move
the reed switch to the
side slightly, and
retighten the screw.
Make sure that the
reed switch does not
hit the indicated
magnet when the
AEROFLYER is in use. Repeat until the speed and
distance modes display correct information.
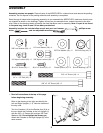
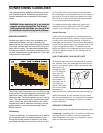
HOW TO ELIMINATE UNWANTED NOISE
If the AEROFLYER makes a squeaking noise during
use, retighten all of the parts used in assembly.
If the AEROFLYER continues to make noise, turn one
of the Resistance Dials (14) counterclockwise and
remove it. Next, remove the Thrust Washers (18),
Thrust Bearing (49), and Tension Washers (19). Using
a small screwdriver, carefully remove the Friction Cup
(17). Make sure that the 1Ó x 1 3/4Ó Washer (56) is
on the thickest part of the axle. Reattach all parts,
making sure that they are in the positions shown
below. Repeat this procedure with the other
Resistance Dial.
11
STORAGE AND TROUBLE-SHOOTING
Reed
Switch
Magnet
Frame
Crossbar
Upright
Resistance
Knob
Lock
Knob
Lock
Washer
Axle
56
14
17
19
18
49