


2 © HAMILTON 2006 / CHRONOGRAPH
© HAMILTON 2006 / CHRONOGRAPH 3
Congratulations
Hamilton is delighted that you have chosen a time-
piece from its collection. You have acquired a small
technological marvel that will serve you faithfully
for many years. The most advanced technologies
were used throughout its manufacture and it un-
derwent stringent controls before it was released
for sale.
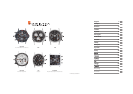
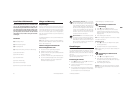
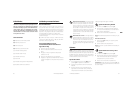
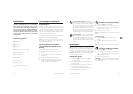
Characteristics
Start/Stop button
Button for resetting to zero
Crown for adjustments
Button for setting date / day
J 60-second counter
I 30-minute counter
4 12-hour counter
G Date / Day
3 Small seconds display
? Telemeter or tachometer scale
Care and maintenance
Recommendations
Like all micro-mechanical precision instruments, your
Hamilton watch should be checked at least once every
two years. Entrust your watch only to an authorized
Hamilton agent. To keep your watch water-resistant,
make sure that its sealing features are tested at every
check-up.
The water-resistance of your watch is indicated on the
case back.
Ex: 3 ATM = 30 meters = 100 feet / 5 ATM = 50 meters
= 165 feet / 10 ATM = 100 meters = 330 feet / 20 ATM =
200 meters = 660 feet (page 78)
Five basic rules for maintaining the
water-resistance of your watch
1. Have your watch checked regularly.
2. Do not move the crown when you are in water.
3. Rinse o your watch with fresh water after any
immersion in seawater.
4. Dry your watch whenever it gets wet.
5. Have your watch checked for water-resistance by
an authorized Hamilton agent each time the case
is opened.
Automatic movement. The mechanism of
the watch includes an oscillating rotor that
winds the mainspring via the motion of your
wrist. The power reserve is approximately 42
hours. If necessary, the watch may be rewound
manually. With most of our models, the beauty
of the inner working of the watch movement
can be admired through the transparent case
back.
Quartz movement. The electrical energy pro-
vided by the battery causes the quartz in the
interior of the watch movement to oscillate
32,768 times per second. This high frequency
gives great accuracy. The seconds hand ad-
vances in steps.
Adjustments
NB: On certain models the crown is screwed down
to guarantee optimal water-resistance. It must be
unscrewed to make adjustments. After adjustments
make sure it is screwed down again.
Please note that water-resistance is only guaranteed
when the crown is screwed down.
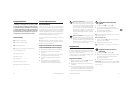
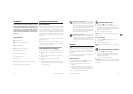
Setting the time
1. Pull out the crown completely to position (p2):
the seconds hand stops*.
2. Set the time by turning the crown in the desired
direction.
3. Push the crown back in completely: the
seconds hand starts again, allowing perfect
synchronization with a time signal.
* stop seconds according to model
Setting the date and the day
1. Pull out the crown to position (p1).
2. Turn the crown counterclockwise until the desired
date is displayed and clockwise to display the
desired day.
3. Push the crown back in completely.
NB: Avoid performing this operation between 8 p.m.
and 2 a.m.
Movement ETA 7753
1. Press button using e.g. the tip of a ballpoint
pen.
2. The date changes at each press.
NB: Adjustment is not possible between 8.30 p.m. and
11.p.m.
Setting the time zone and the
date
1. Pull out the crown to to position (p1).
2. Turn the crown to advance the hour hand.
The date changes each time the hand passes
12 o’ clock midnight.
3. Push the crown back in completely.
Important: Do not leave the crown in position (p1)
for longer than 20 minutes, as this might interfere with
the time function.