


6
|
GARY FISHER SERVICE INFORMATION
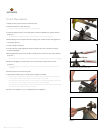
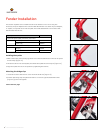
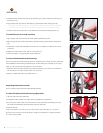
1. Clamp the saw guide securely in the bench vise.
2. Clamp the steerer in the saw guide.
+ Be careful not to crush the steerer; do not overtighten.
3. Using only light pressure on the saw blade, cut about halfway through the steerer
(Figure 1).
+ Be careful not to create loose bers—on the inside or the outside the steerer.
4. While keeping the cut aligned with the cutting guide, rotate the fork 180 degrees in
the guide (Figure 2).
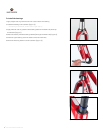
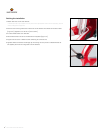
5. Finish cutting the steerer.
6. Loosen the saw guide slightly and push the steerer through until the end can be
dressed. Retighten.
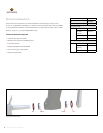
7. Working away from the crown, le the outside corner off the cut end of the steerer.
(Figure 3)
+ You can also use sand paper for this step. Sandpaper is less aggressive and a bit more forgiving.
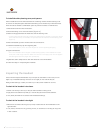
8. With the sandpaper, smooth the end of the steer tube and the inside corner
(Figure 4).
+ This can be done with a “shoeshine” movement or by rotating and reciprocation with the
sandpaper.
9. Remove the fork from the saw guide.
10. Inspect for frayed, loose, or broken bers. Repair as needed.
+ If, despite your care, some individual bers break free, treat the bers with care because if
one is pulled or moved, it could “zipper” down the length or the steerer.
+ If a loose ber area is small and short, you can repair it. To repair, glue the ber in place with
two-part epoxy. Finish by lightly sanding with 220 or 400 grit sandpaper.
+ If you see loose bers extending more than one-half the length of the steerer, have the fork
evaluated by Fisher before repairing or installing.
The fork is now ready for you to complete the fork installation.