


19
6
Tools Required (included):
Allen Wrench
Multi Open End Wrench
Multi “T” Tool w/Phillips Screwdriver
NOTE: All location references, such as front, rear, left or right,
made in these instructions are from the user being
on the equipment and facing forward.
ASSEMBLY INSTRUCTIONS
Occasionally our products contain components that are pre-lubricated at the factory. We recommend
that you protect flooring, or anything else the parts may contact, with newspaper or cloth.
IMPORTANT
PLEASE READ ALL INSTRUCTIONS CAREFULLY BEFORE ASSEMBLING.
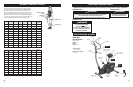
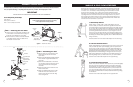
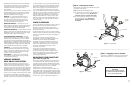
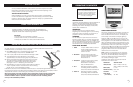
STEP 2 – Assembling the Seat
a) Attach Seat onto the bracket of the
Seat Tube and secure with three
Nylon Nuts.
b) Insert Large M8 Washer, Bushing Sleeve,
then another Large M8 Washer onto
the Knob.
c) Insert the threaded side of the Knob
into the Seat Support tube. Then put it
through the Seat Tube and tighten
the Knob.
d) Insert the Seat Support Tube into the
Main Frame Tube.
e) Align the desired Seat Support Tube
hole with the hole located on the
Main Frame Tube and secure using
the Locking Knob.
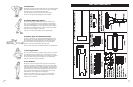
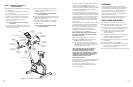
STEP 1 – Attaching the Foot Tubes
a) Attach Front Foot Tube (with wheels) to the
Front Bracket of the Main Frame using two
Bolts with a Flat Washer on each Bolt.
b) Attach Rear Foot Tube to the Rear Bracket
of the Main Frame using two Bolts with a
Flat Washer on each Bolt.
Figure 1 - Install Foot Tubes
Figure 2 - Install Seat
rear foot
tube
front foot
tube
seat
nylon nut
seat tube
large M8 washer
bushing sleeve
large M8 washer
locking knob
seat support
tube
adjustment
knob
main frame
M8 x 20mm
phillips bolt (2)
M8 x 20mm
phillips bolt (2)
main frame
M8 flat washer (2)
M8 flat washer (2)
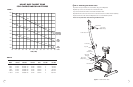
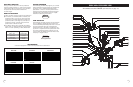
Stretches can help improve flexibility and relieve the tightness in muscles
that results from repetitive sport movements that require a limited range
of motion. 10 to 12 minutes of daily stretching is recommended. This can
be done when warming up or cooling down. When performing these
stretches, your movements should be slow and smooth, with no bouncing
or jerking. Move into the stretch until you feel a slight tension, not pain, in
the muscle and hold the stretch for 20 to 30 seconds. Breathe slowly and
rhythmically. Be sure not to hold your breath. Remember that all stretches
must be done for both sides of your body.
1. Quadriceps Stretch
Stand close to a wall, chair or other solid object. Use one
hand to assist your balance. Bend the opposite knee and lift
your heel towards your buttocks. Reach back and grasp the top
of your foot with the same side hand. Keeping your inner thighs
close together, slowly pull your foot towards your buttocks until
you feel a gentle stretch in the front of your thigh.You do not
have to touch your buttocks with your heel. Stop pulling when
you feel the stretch. Keep your kneecap pointing straight down
and keep your knees close together. (Do not let the lifted knee
swing outward.)
Hold the stretch for 20 to 30 seconds. Repeat for the other leg.
2. Calf and Achilles Stretch
Stand approximately one arms length away from a wall or chair
with your feet hip-width apart. Keeping your toes pointed for-
ward,move one leg in close to the chair while extending the
other leg behind you. Bending the leg closest to the chair and
keeping the other leg straight, place your hands on the chair.
Keep the heel of the back leg on the ground and move your
hips forward. Slowly lean forward from the ankle, keeping your
back leg straight until you feel a stretch in your calf muscles.
Hold for 20 to 30 seconds. Repeat for the opposite leg.
3. Overhead/Triceps Stretch
Stand with your feet shoulder width apart and your knees slightly
bent. Lift one arm overhead and bend your elbow, reaching
down behind your head with your hand toward the opposite
shoulder blade. Walk your fingertips down your back as far as
you can. Hold this position. Reach up with your opposite hand
and grasp your flexed elbow. Gently assist the stretch by pulling
on the elbow.
Hold for 20 to 30 seconds. Repeat for the opposite arm.
WARM UP & COOL DOWN STRETCHES