


1312
OPERATING THE MONITOR
INTRODUCTION
This Monitor provides different programs designed to
tailor to your fitness goals. Simply choose the
program you like, set the parameters and begin
exercising. The Monitor will display calories, time,
speed, pulse, and distance.
IMPORTANT
Always consult with your physician before
beginning any exercise program. If you are taking
medication which may affect your heart rate, a
physician’s advice is absolutely essential.
WARNING
Do not attempt to open the back cover of the
Monitor console. This is not a battery storage area;
this Computer is powered by an AC Adapter. This
bike is to be used only indoors and in a dry location.
Do not plug the AC Adapter into the wall until the
electronics monitor is completely assembled.
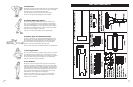
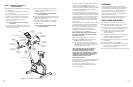
DATA INPUT BUTTONS
1. ENTER To input desired value or workout
mode. Holding this button for
3 seconds will reset all function
value to be zero.
2. RECOVERY Press to enter into Recovery
Function, if the pulse exceeds 72.
Recovery lasts for 1 minute in
Fitness Levels 1-6.
3. START/STOP To Start or Stop a workout, press
this button. Start Body Fat
Measurement and quit the
Body Fat Measurement.
4. UP ▲ Selecting a program or setting
increasing values of Resistance
Level, Time, Calories and Distance.
5. DOWN ▼ Selecting a program or setting
decreasing values of Resistance
Level, Time, Calories,and Distance.
USING YOUR MONITOR
Plug the AC Adapter into the Monitor and then into
a 110 volt electrical socket to turn the Monitor on.
When the Monitor is first turned on, the display will
emit a beep as the entire LCD Display lights up.
Press the Up ▲ or Down ▼ button to move to the
desired program. When the program is flashing, that
is the program that would be selected. Press Enter to
select the desired program. If the parameters in the
program are at zero in the beginning of the workout,
the parameters will count up from zero. During the
workout, the Up ▲ and Down ▼ buttons will increase
(UP)/decrease (DOWN) the resistance load. The
program profiles and functions are described in
detail at the end of this section.
Note: If there is no input signal for over 4 minutes,
the system will enter Sleep Mode and all displays
will turn off automatically. Simply re-starting your
workout or pressing any button will result in the
LCD screen powering up again.
Holding the Enter button for three seconds will
reset all function value to zero.
FUNCTION DISPLAY VALUE
TIME (minutes) 00:00 - 99:00 (Count Up)
99.00 - 00:00 (Count Down)
SPEED (MPH) 0 - 99.5
DISTANCE (miles) 0.00 - 99.9
CALORIES 0 - 999
PULSE (Beats
per minutes) 40 - 240
WARNING
Do not carry batteries loosely, such as
in a purse or pocket. The batteries may
explode or leak and cause injury if
installed improperly, misused, disposed
of in a fire or recharged.
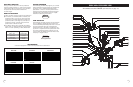
USING YOUR UPRIGHT BIKE
Once your bike is assembled, make sure that your workout space has a solid,
level surface with plenty of space around it. We recommend placing a mat
under your bike to protect your flooring.
Correct Workout Position
When pedaling do not lock out your knees, at the bottom of the pedaling
motion there should be a slight bend in the knee. Keep your head in a neutral
position to minimize neck and upper back strain. Always try to pedal the bike
with a smooth and rhythmic motion.
GETTING STARTED
The bike provides a completely smooth and natural feeling that
minimizes the impact on your hips, knees and ankles while providing
a superior aerobic and muscle toning workout.
IMPORTANT:
• This bike is not recommended for children.
• Always make sure that you feel balanced and secure.
• Always use your bike on a clean, solid and level surface.
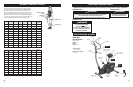
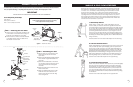
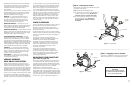
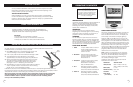
USING THE PULSE FUNCTION ON THE HANDLEBARS
The Pulse window on your Monitor works in conjunction with the pulse sensors found on the
handlebars. When you are ready to read your pulse:
1) Place both hands firmly on the pulse sensors. For the most
accurate reading, it is important to use both hands.
2) Look at your pulse window. The small heart will begin to blink.
3) Your estimated heart rate will appear in the window
approximately 6 seconds after you grasp the pulse sensors.
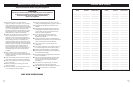
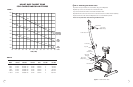
4) Refer to the Target Heart Rate Zone Chart found on page
18 of this manual. For additional information about the
importance of working within certain heart rate ranges,
see pages 16 and 17 – Measuring Your Heart Rate.
5) This estimate is not exact and persons with medical conditions
and/or a specific need for accurate heart rate monitoring
should not rely on the estimations provided.
Pulse sensors, located on the handlebars enable the user to read his/her approximate pulse rate.
By grasping the sensors and holding firmly, the display will read your pulse rate in the display window.
Your pulse will continue to read as long as your hands stay on the pulse sensors.
When used properly, the heart rate pulse sensors and display monitor provide a reasonably
accurate estimate of your actual heart rate. This estimate is not exact and persons with
medical conditions and/or a specific need for accurate heart rate monitoring should
not rely on the estimations provided.
Pulse
Sensors