


— 9 —
— 8 —
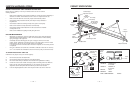
HOW TO ATTACH THE MULTI FUNCTION ATTACHMENT
The multi function attachment provided with your unit has been uniquely designed to serve several
purposes. It can be placed at the top or bottom of the exerciser and angled toward you or away from
you depending upon what is comfortable for you.
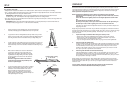
Two thick foam pads are provided with the multi function attachment. They must be attached to the
attachment (if not already) before exercising. To do this:
1. Simply wet each end of the straight crossbar of the
attachment with some soapy water.
2. Attach foam pads on the crossbar as shown
in Figure 1. Let dry before beginning to exercise
with the multi function attachment.
Proper ways to use the multi function attachment in accordance
with the exercises you wish to do:
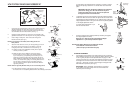
PULL UPS
1. Locate the holes at the top of the right and left rails on the
column end of the unit.
2. With the attachment angled toward the glideboard, line up
the brackets on the attachment with the desired position
holes on the rails.
3. Insert the 2 large hitch pins through the holes on the
multi function attachment brackets and the hole on the
rails, as shown in Figure 2.
4. You are now ready to perform pull up and chin up exercises to
work the arms, lats and back. See your Exercise Booklet for
specific exercises.
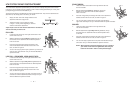
LEG PULL: CRUNCHES, LEGS AND SIT UPS
1. Locate the holes at the top of the right and left rails on the
column end of the unit.
2. With the attachment angled away from the glideboard, line
up the brackets on the attachment with the desired position
holes on the rails.
3. Insert the 2 large hitch pins through the holes on the
multi function attachment brackets and the hole on the
rails, as shown in Figure 3.
4. You are now ready to perform leg pulls, crunches and sit up
exercises to work the abdominals, waist and legs. See your
Exercise Booklet for specific exercises.
Fig. 2
Fig. 1
Fig. 3
FRONT PRESS
1. Locate the holes at the bottom of the right and left rails near
the front crossbar.
2. With the attachment toward the glideboard, line up the
brackets on the attachment with the desired position
holes on the rails.
3. Insert the 2 large hitch pins through the holes on the attachment
brackets and the hole on the rails, as shown in Figure 4.
4. You are now ready to perform the front press which works the
upper chest and triceps. See your Exercise Booklet for specific exercises.
SQUATS
1. Locate the holes at the bottom of the right and left rails
near the front crossbar.
2. With the attachment angled away from the glideboard, line up
the brackets on the attachment with the desired position holes
on the rails.
3. Insert the 2 large hitch pins through the holes on the attachment
brackets and the hole on the rails, as shown in Figure 5.
4. You are now ready to perform the front press which works the thighs
and calves. See your Exercise Booklet for specific exercises.
NOTE: When performing the squat exercises, be sure to position
your hands on the side of the glideboard, NOT along the
bottom of the board in order to avoid pinched fingers.
Fig. 5
Fig. 4