


— 10 —
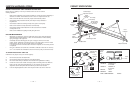
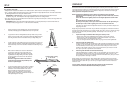
(b) Take hold of the Vertical Column and pull it up until it is upright.
Release the Spring Loaded Pin. You should hear it lock back into
place.
IMPORTANT: Be sure the Spring Loaded Pin is locked into
place before using your unit. You will know the pin is
locked into place when you can see the end protrude
through the inside of the rail bracket.
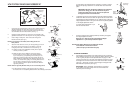
6. (a) Position one foot on back crossbar to keep the product from lifting
off the floor. With one hand on either the right or left rail and the other
hand holding the height adjustment “C” pin, slide the rails up along the
height adjustment column. Line up the hole to the first (lowest) position
on the height adjustment column.
(b) Insert height adjustment “C” pin
from the back as shown.
7. Push the pin down into its locked position (it should lay flat against
the height adjustment column).
Never sit on or exercise on the unit without the height
adjustment “C” pin securely locked into place.
NOTE: Insert Safety Hitch Pin in the side hole located
at the bottom of the Vertical Column.
(This is the pin you removed in step 5a).
8. If the Stopper at the bottom of the Vertical Column has not already
been installed, please do so now. Locate the Stopper which is packed
in the Leg Pully Kit (See Product Specifications on page 5 of this
manual). Unscrew nut on the end of the Stopper and remove. Insert
the Stopper into the hole located in the center of the Back Crossbar.
(See Fig. 1) Screw the nut back onto the Stopper and tighten with
Allen Wrenches provided. (See Fig. 2)
IMPORTANT: Proper installation of the Stopper is necessary
for the Rollers to function easily when the unit is folded and
rolled into place for storage.
— 7 —
Fig. 1
Fig. 2
8.
STOPPER ASSEMBLY
6b.
5b.
6a.
7.
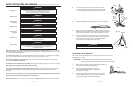
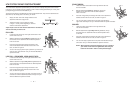
HOW TO ATTACH THE LEG PULLEY ACCESSORY KIT
1. Connect the Leg Pulley Bracket to the top of the Vertical Column by
aligning Bracket with the hole at the top of the column. (Be sure
bracket is right side up.) Insert Large Hitch Pin through the hole to
secure Bracket onto the Vertical Column (See Fig. 1).
2. Detach the Cable Assembly from the loop on the underside of the
glideboard and attach one of the Clips from the Leg Pulley Assembly.
3. Place D-Ring on Pulley first. Then connect the D-Ring to the
Bracket as shown.(See Fig. 2)
NOTE: If rope appears to be twisted, take D-Ring off and turn
Pulley around.
4. Attach the Foot Harness to one of your feet by placing your foot in
the Harness so the sewn-in-ring is on the bottom of your foot.
Pull tightly on the belt so the Harness is secure.(See Fig. 3)
5. (a) Position yourself on the glideboard correctly for the specific
exercise you want to perform.
(b) While lying down on the glideboard, connect the Clip on
the end of the rope to an O-Ring on the Harness attached
to your foot.(See Fig 4.) Depending on the exercise you are
performing, connect the Clip to the proper O-Ring. Be sure to
always stabilize the glideboard when clipping the Harness on or
off. Also, use caution when getting on or off the glideboard. You
are now ready to exercise using the Leg Pulley Accessory.
See your Exercise Guide for specific exercises that utilize the
Leg Pulley Accessory.
NOTE: Remove Leg Pulley Bracket when you are not exercising with it.
(c) To disconnect the Harness, unclip the rope from the O-Ring on
the Harness. Be sure to stabilize glideboard when disconnecting Foot Harness.
Foot Harness
Harness
Buckle
Clip
O-Ring (loose)
O-Ring (sewn in)
O-Ring (loose)
Fig. 3
Fig. 4
Leg Pulley Accessory Kit
Rope
Pulley/D-Ring
Assembly
Clip
Large
Hitch
Pin
Clip
Harness
Leg Pulley Bracket
For use with leg pulley
accessory only.
Fig. 1
Fig. 2
Bracket
Bracket
D-Ring
Large Hitch Pin
Pulley
Pulley
Release
spring
loaded pin
Pull Vertical
Column Up